Basic Configuration
This section covers the basic aspects to config Google Universal Analytics to ensure a correct data collection of your website.
Filters
It's important to verify that at least you have one default view without filters, otherwise you could fall into unexpected issues and lost valuable tracking data.
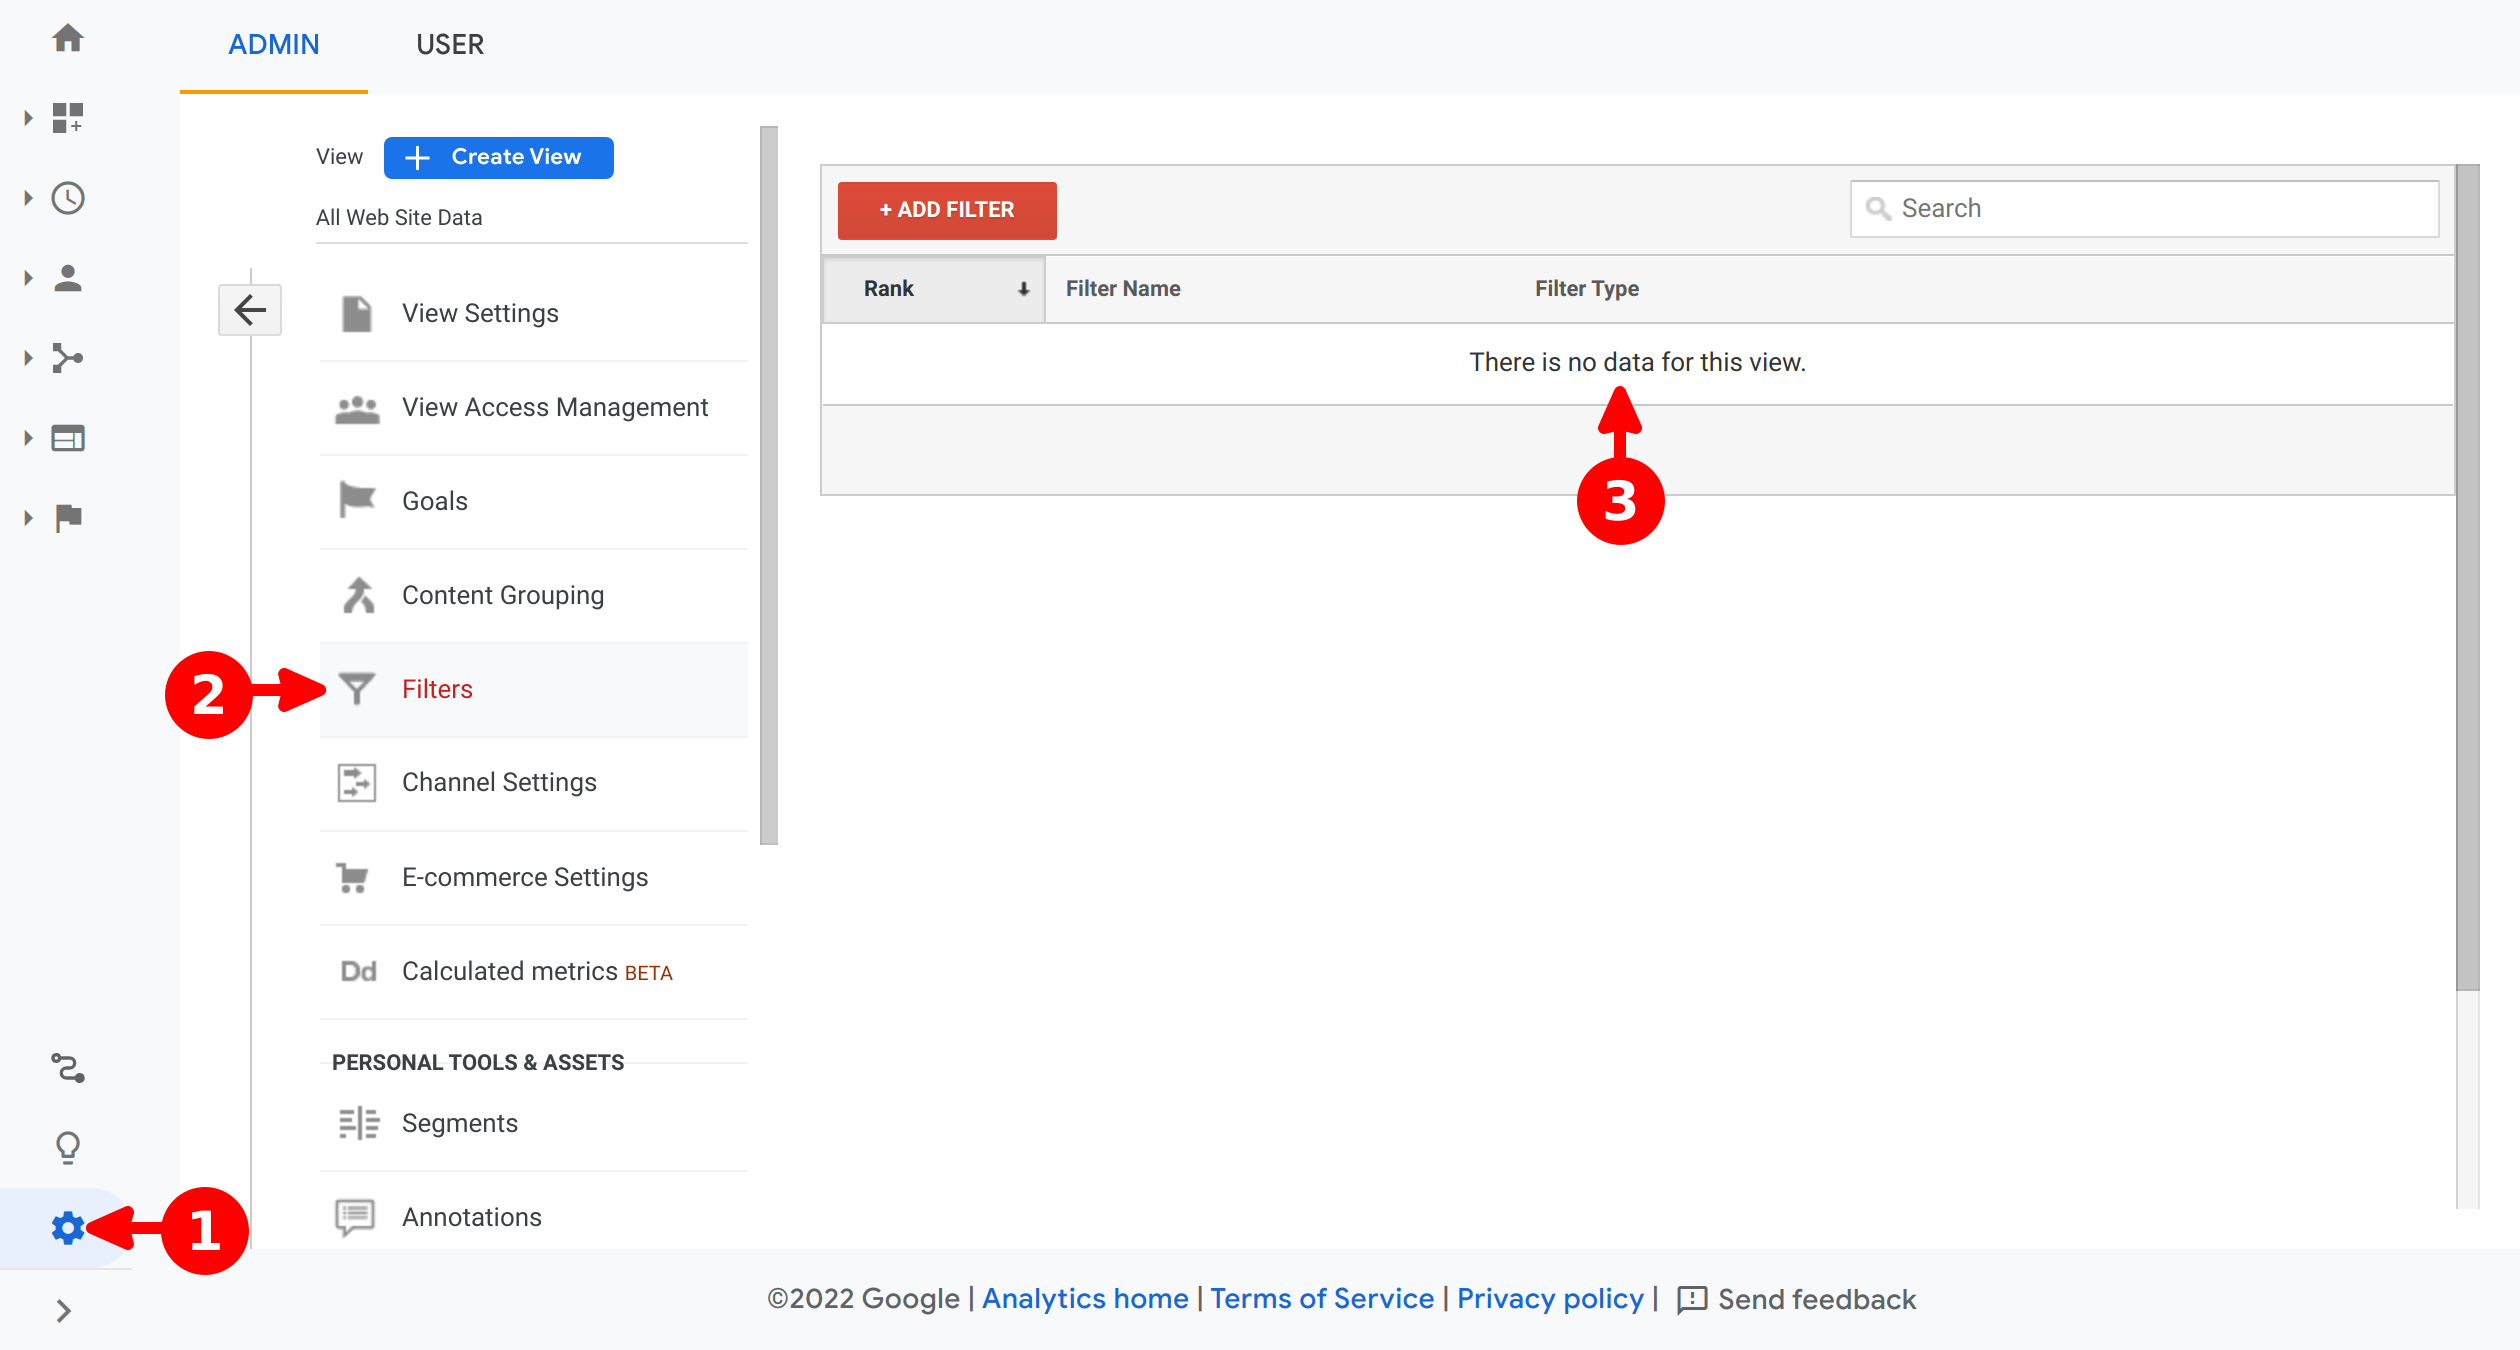
- Go to Admin
- Under View panel, click on Filters
- Verify that there is no filter configured
View Settings
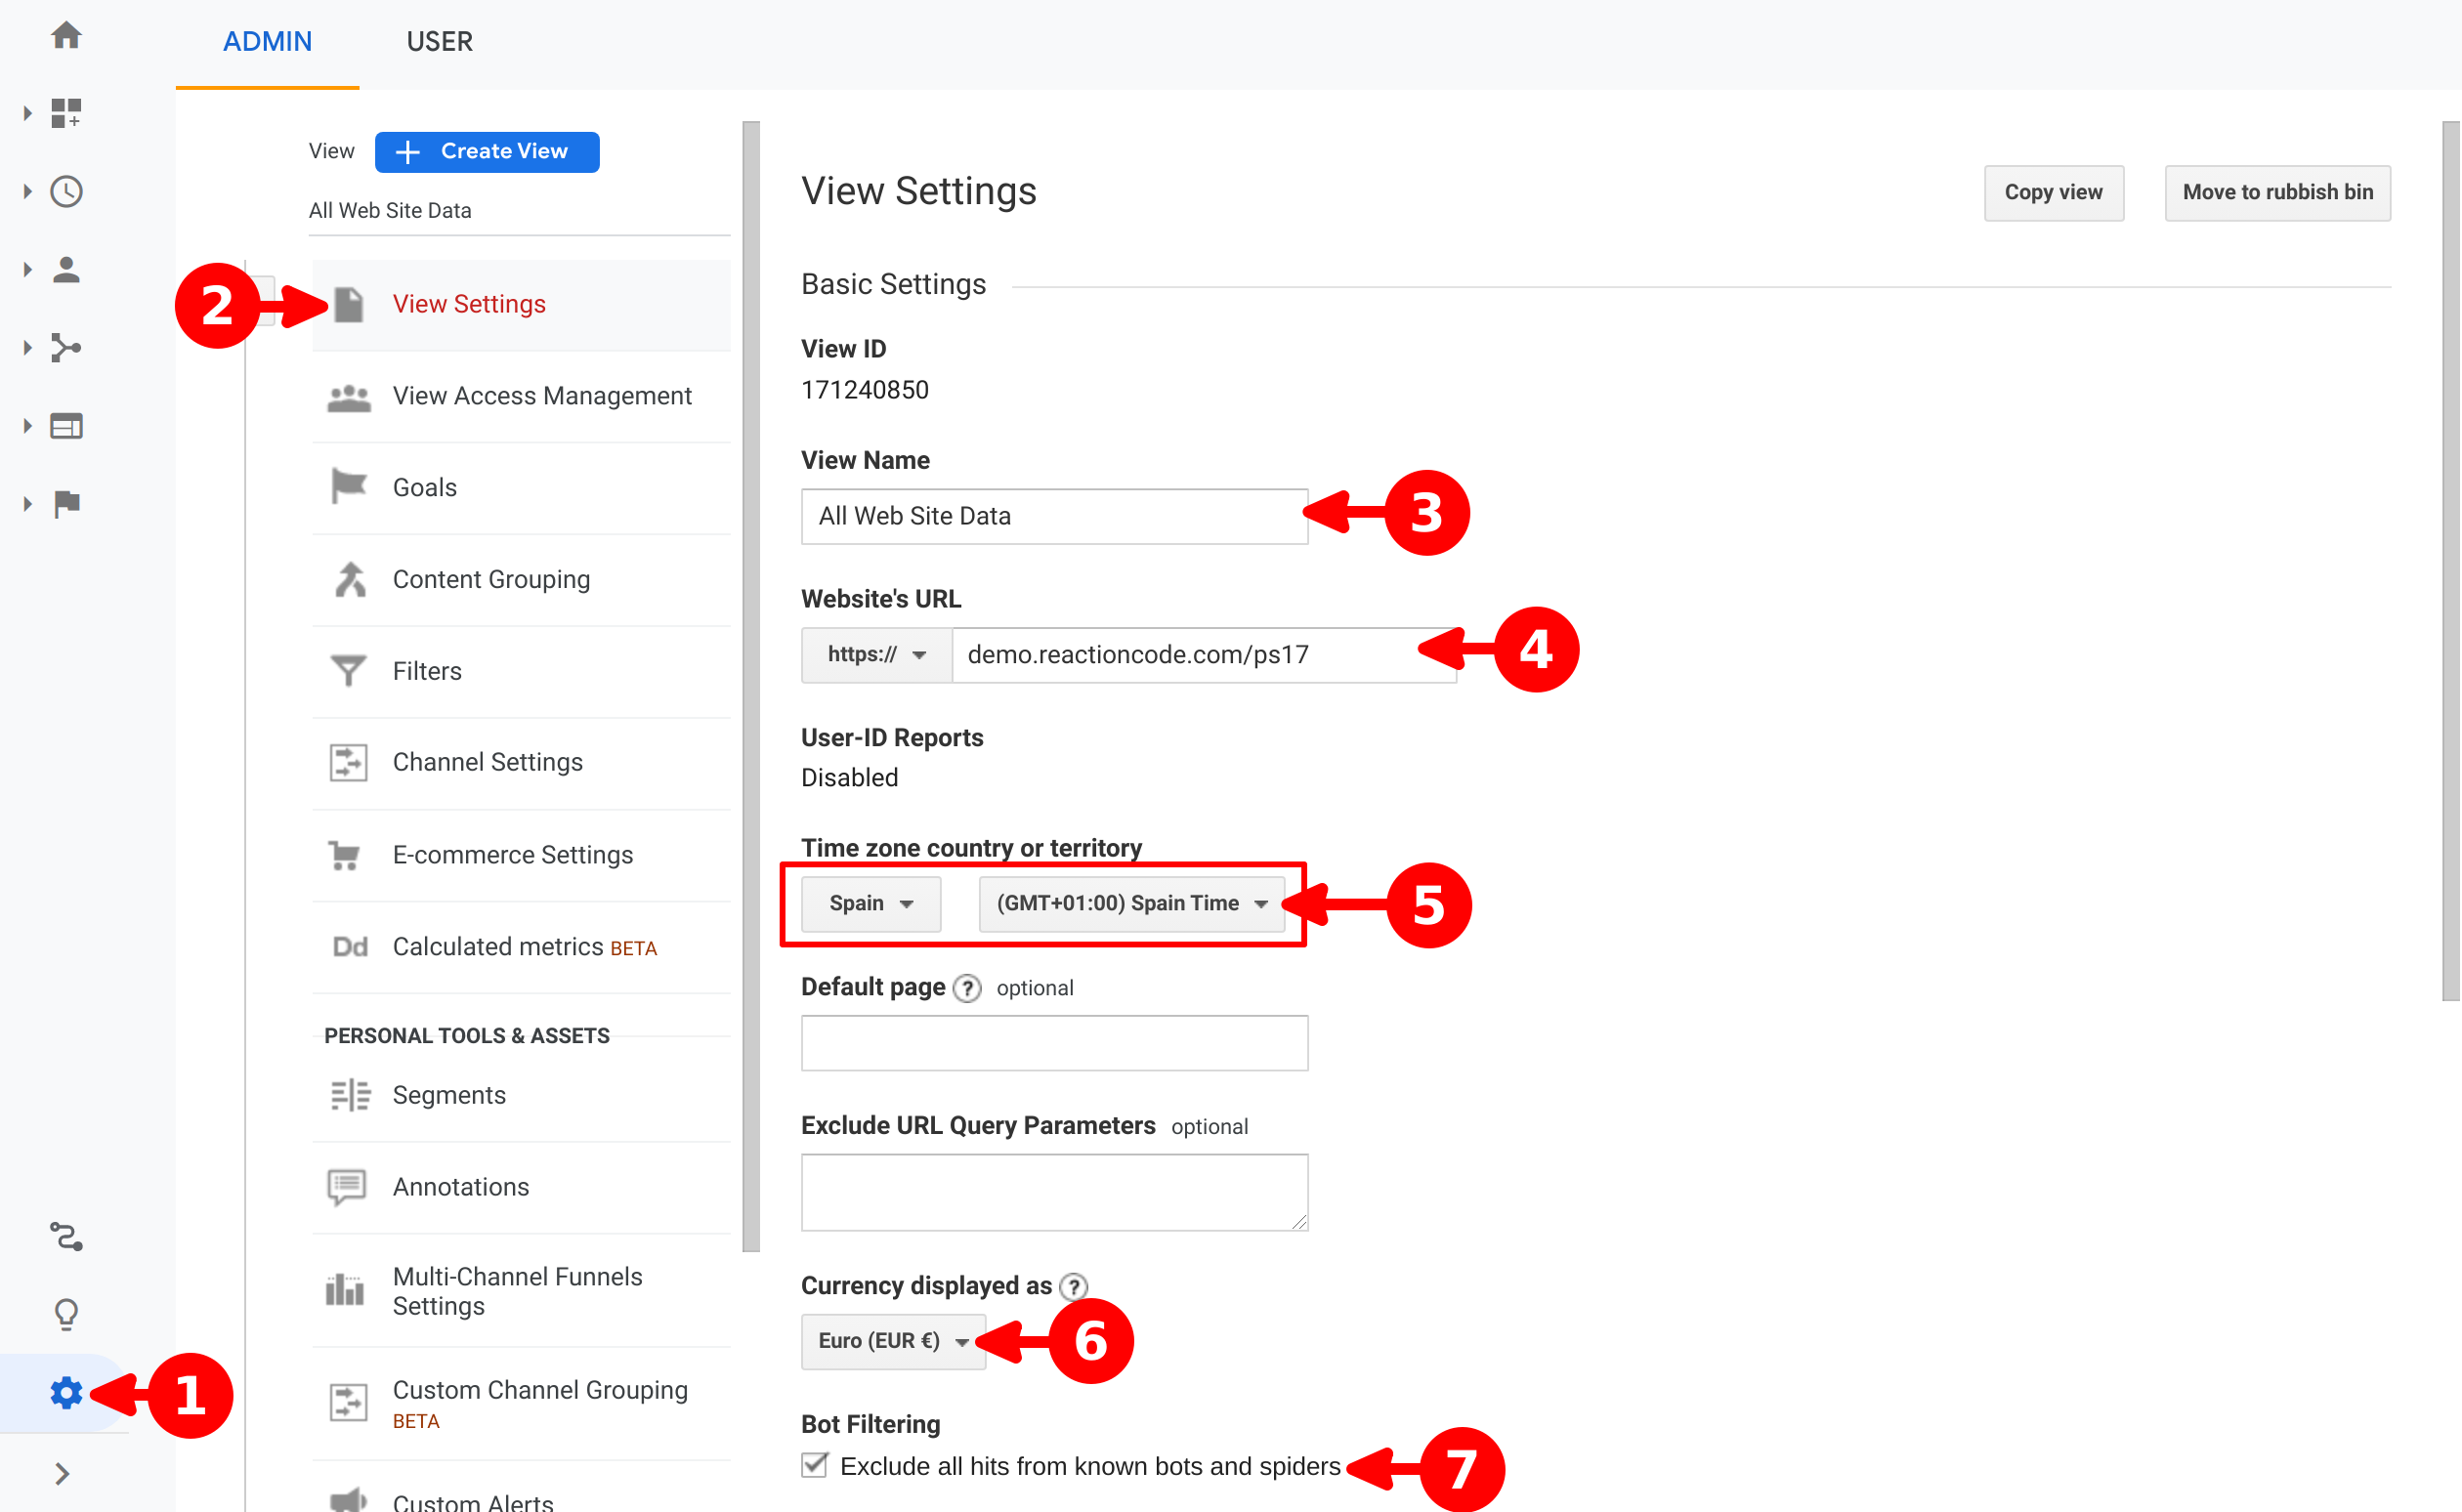
- Go to Admin
- click on View Settings
- Set a View Name
- Set main Website's URL
- Select your country and time zone
- Select the main currency of your business*
- Select exclude known bots and spiders to have clean reports
Info
If the shop has multi currencies, all values in reports will be converted to main currency
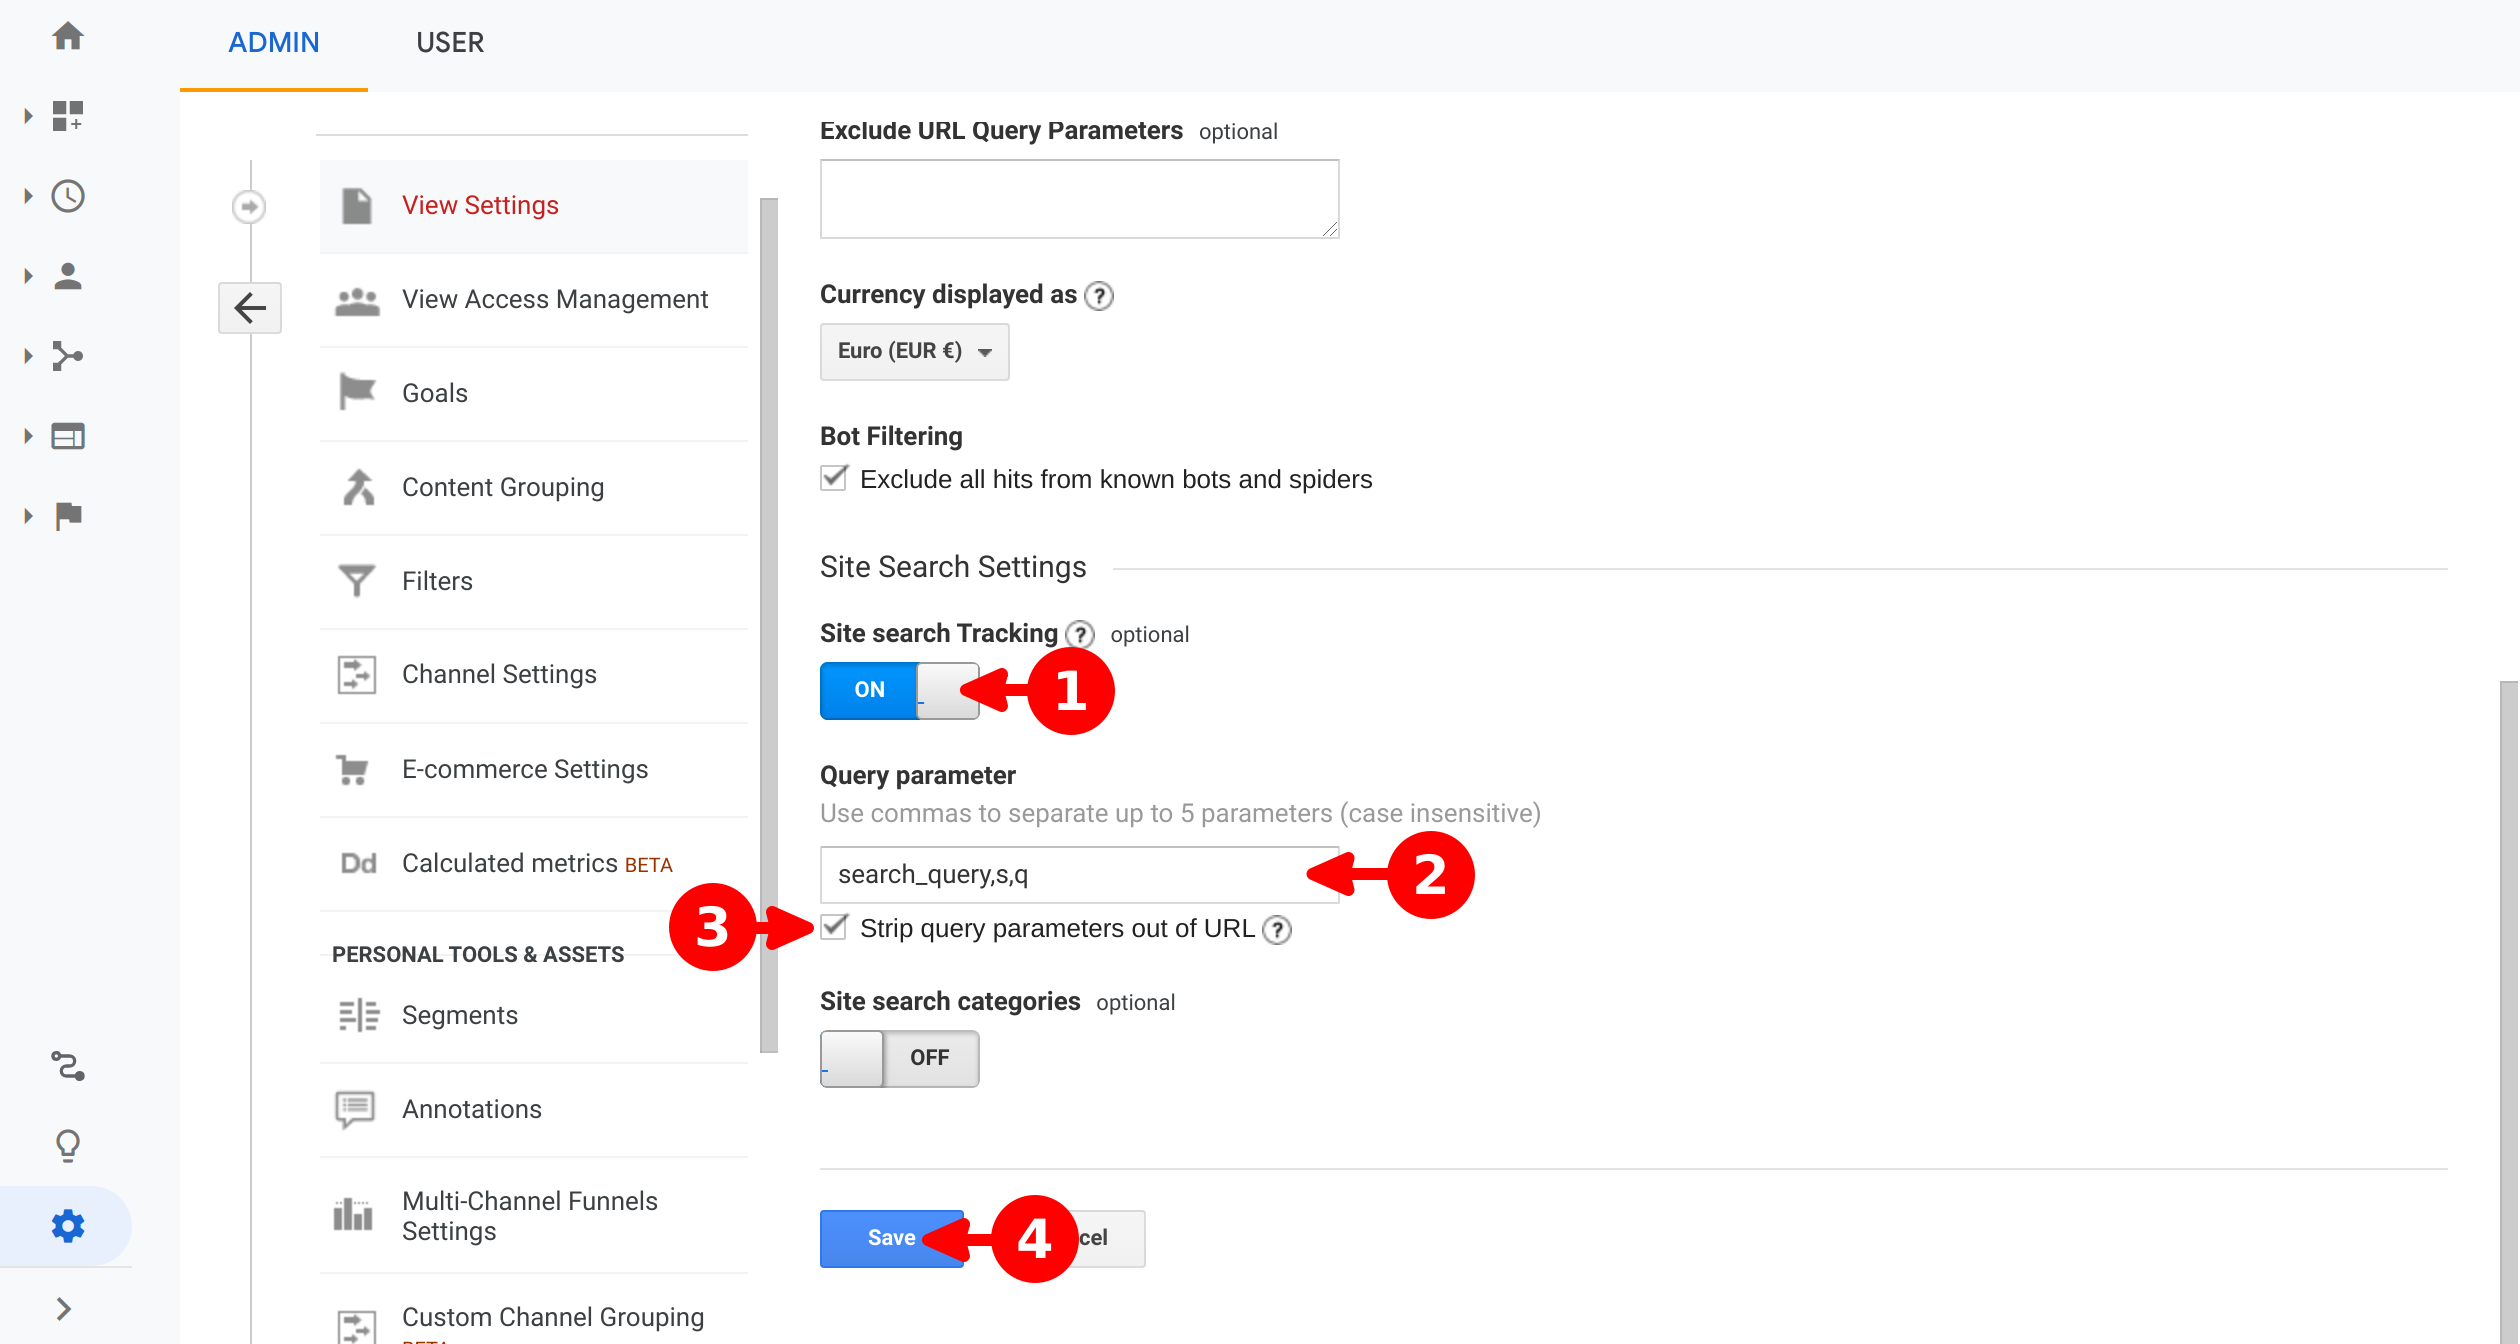
- Enable Site search Tracking to collect data on Site Search reports
- Set Query parameter, for PS16 is
search_query, for PS17 ares,q - Set Strip query parameters out of URL to get better reports
- Click on Save
Referral Exclusion List
If checkout has external payment methods, it's essential to include those external domains used by the payment providers in the referral exclusion list.
This will prevent to Analytics displaying the payment domains in the reports as a source for each transaction.
Tip
If cross domain tracking is enabled, it will be essential to include all top level domains involved in the cross domain tracking
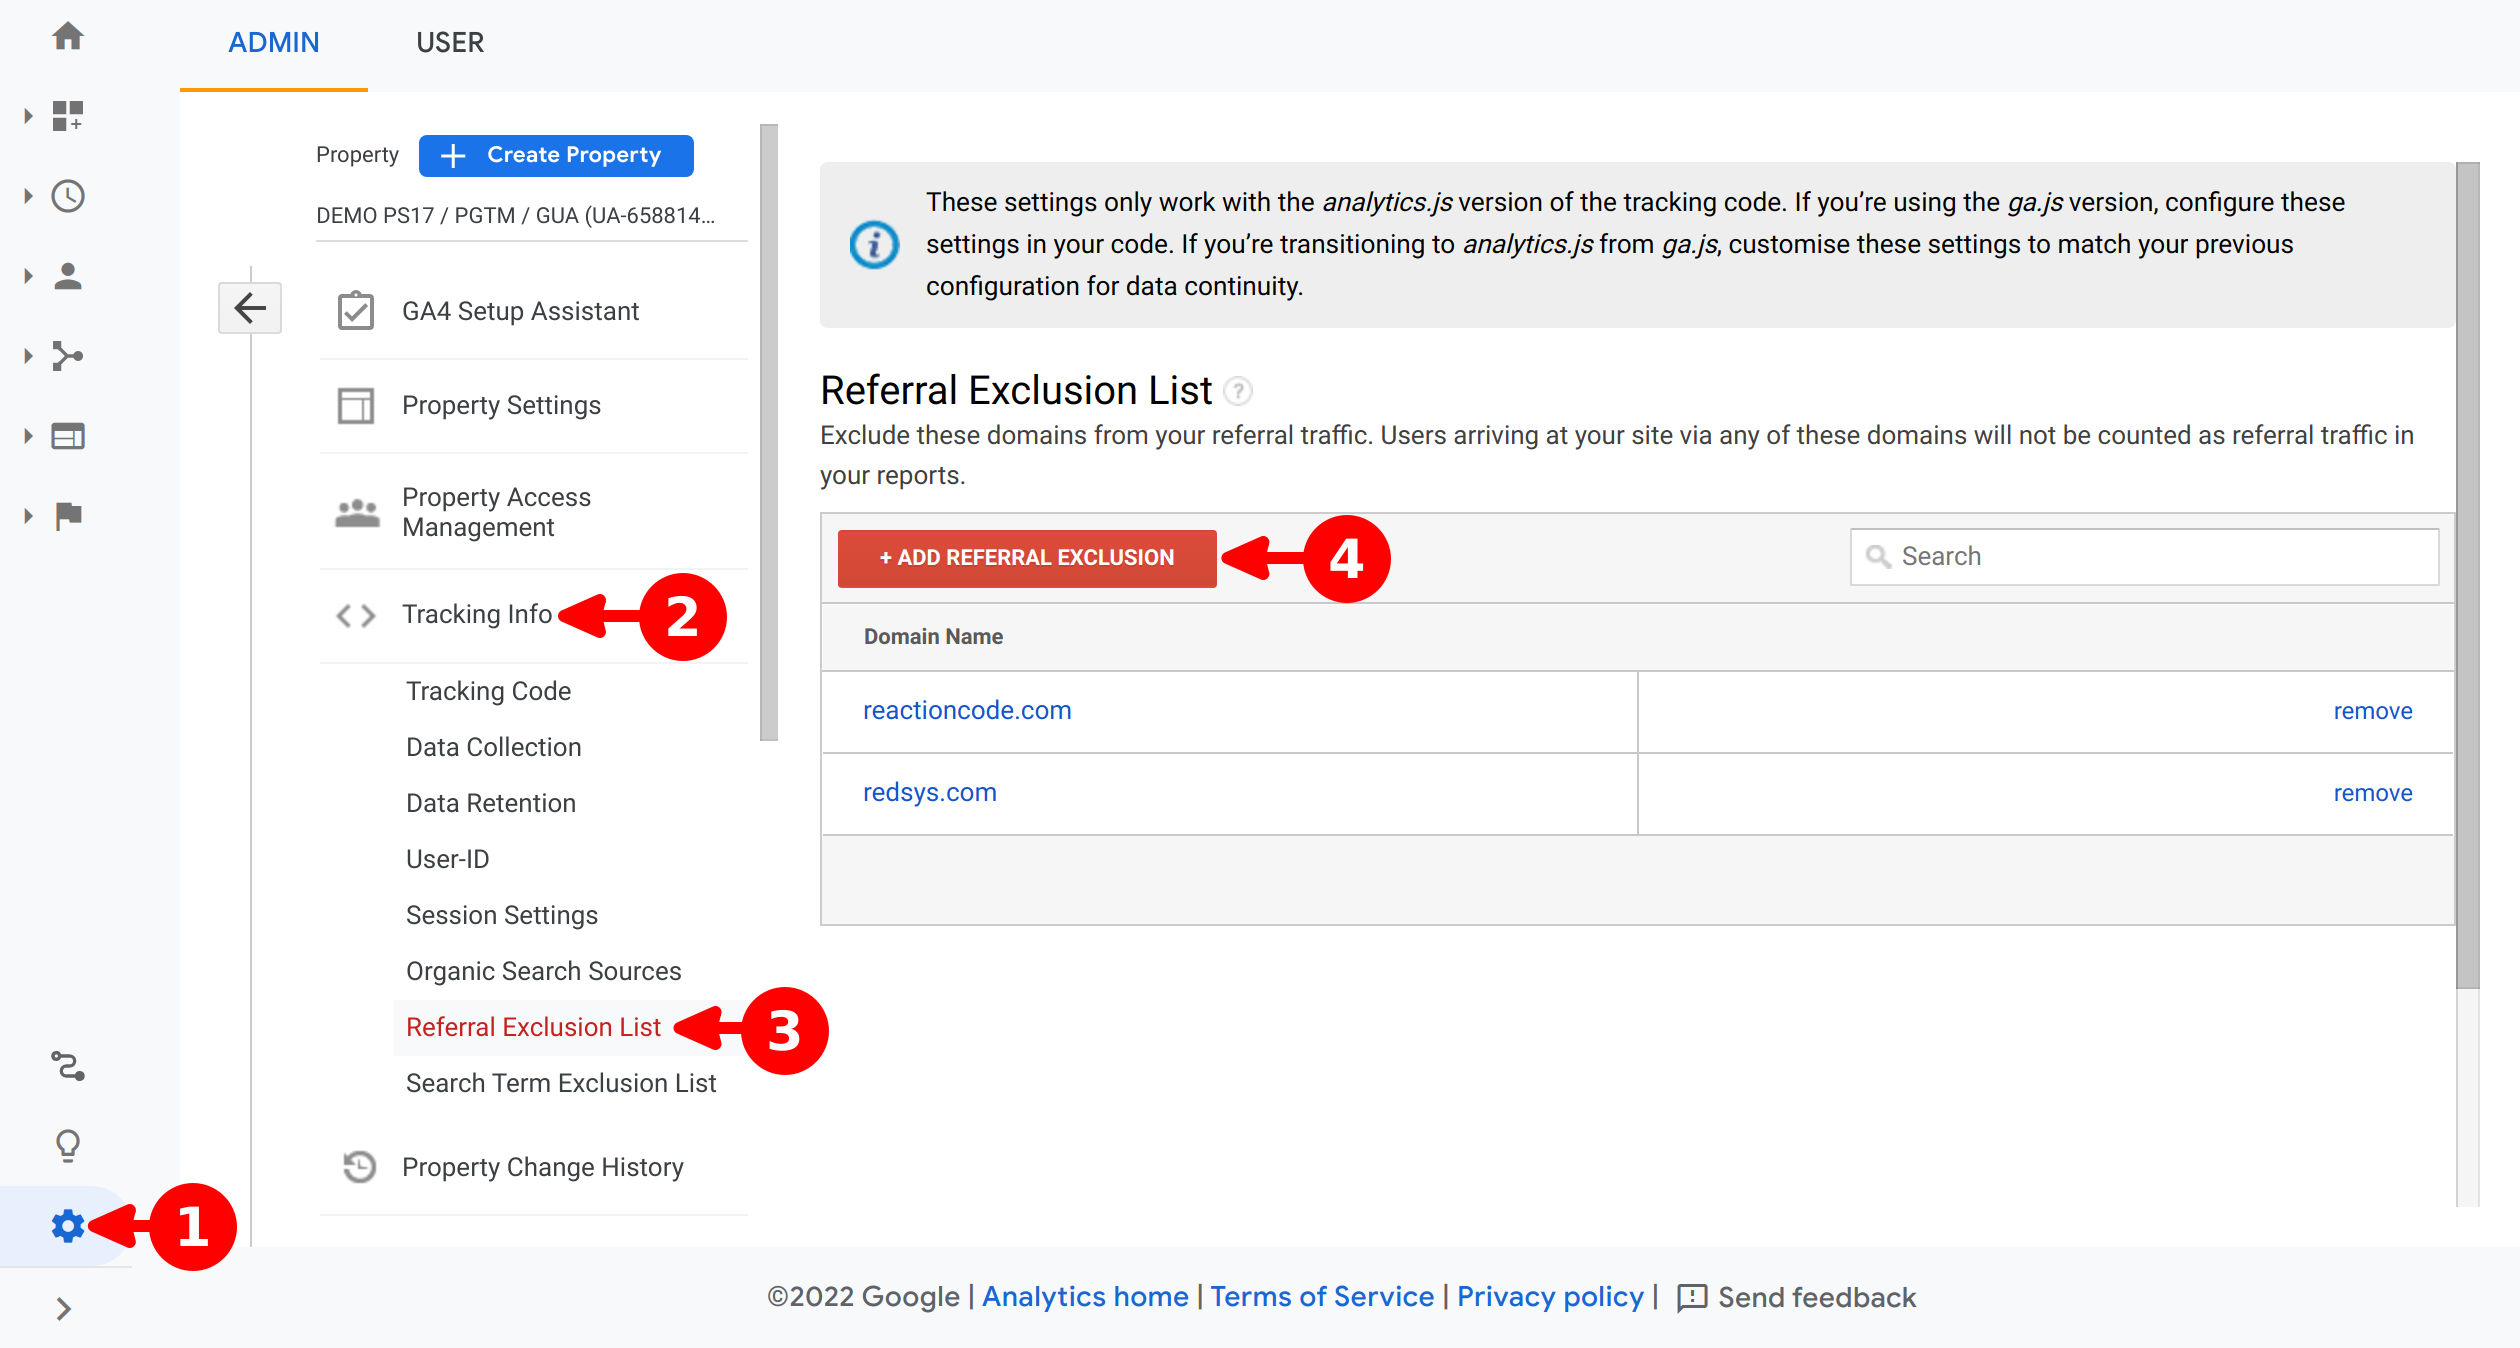
- Click on Admin
- Click on Referral exclusion list
- Click on + Add referral exclusion
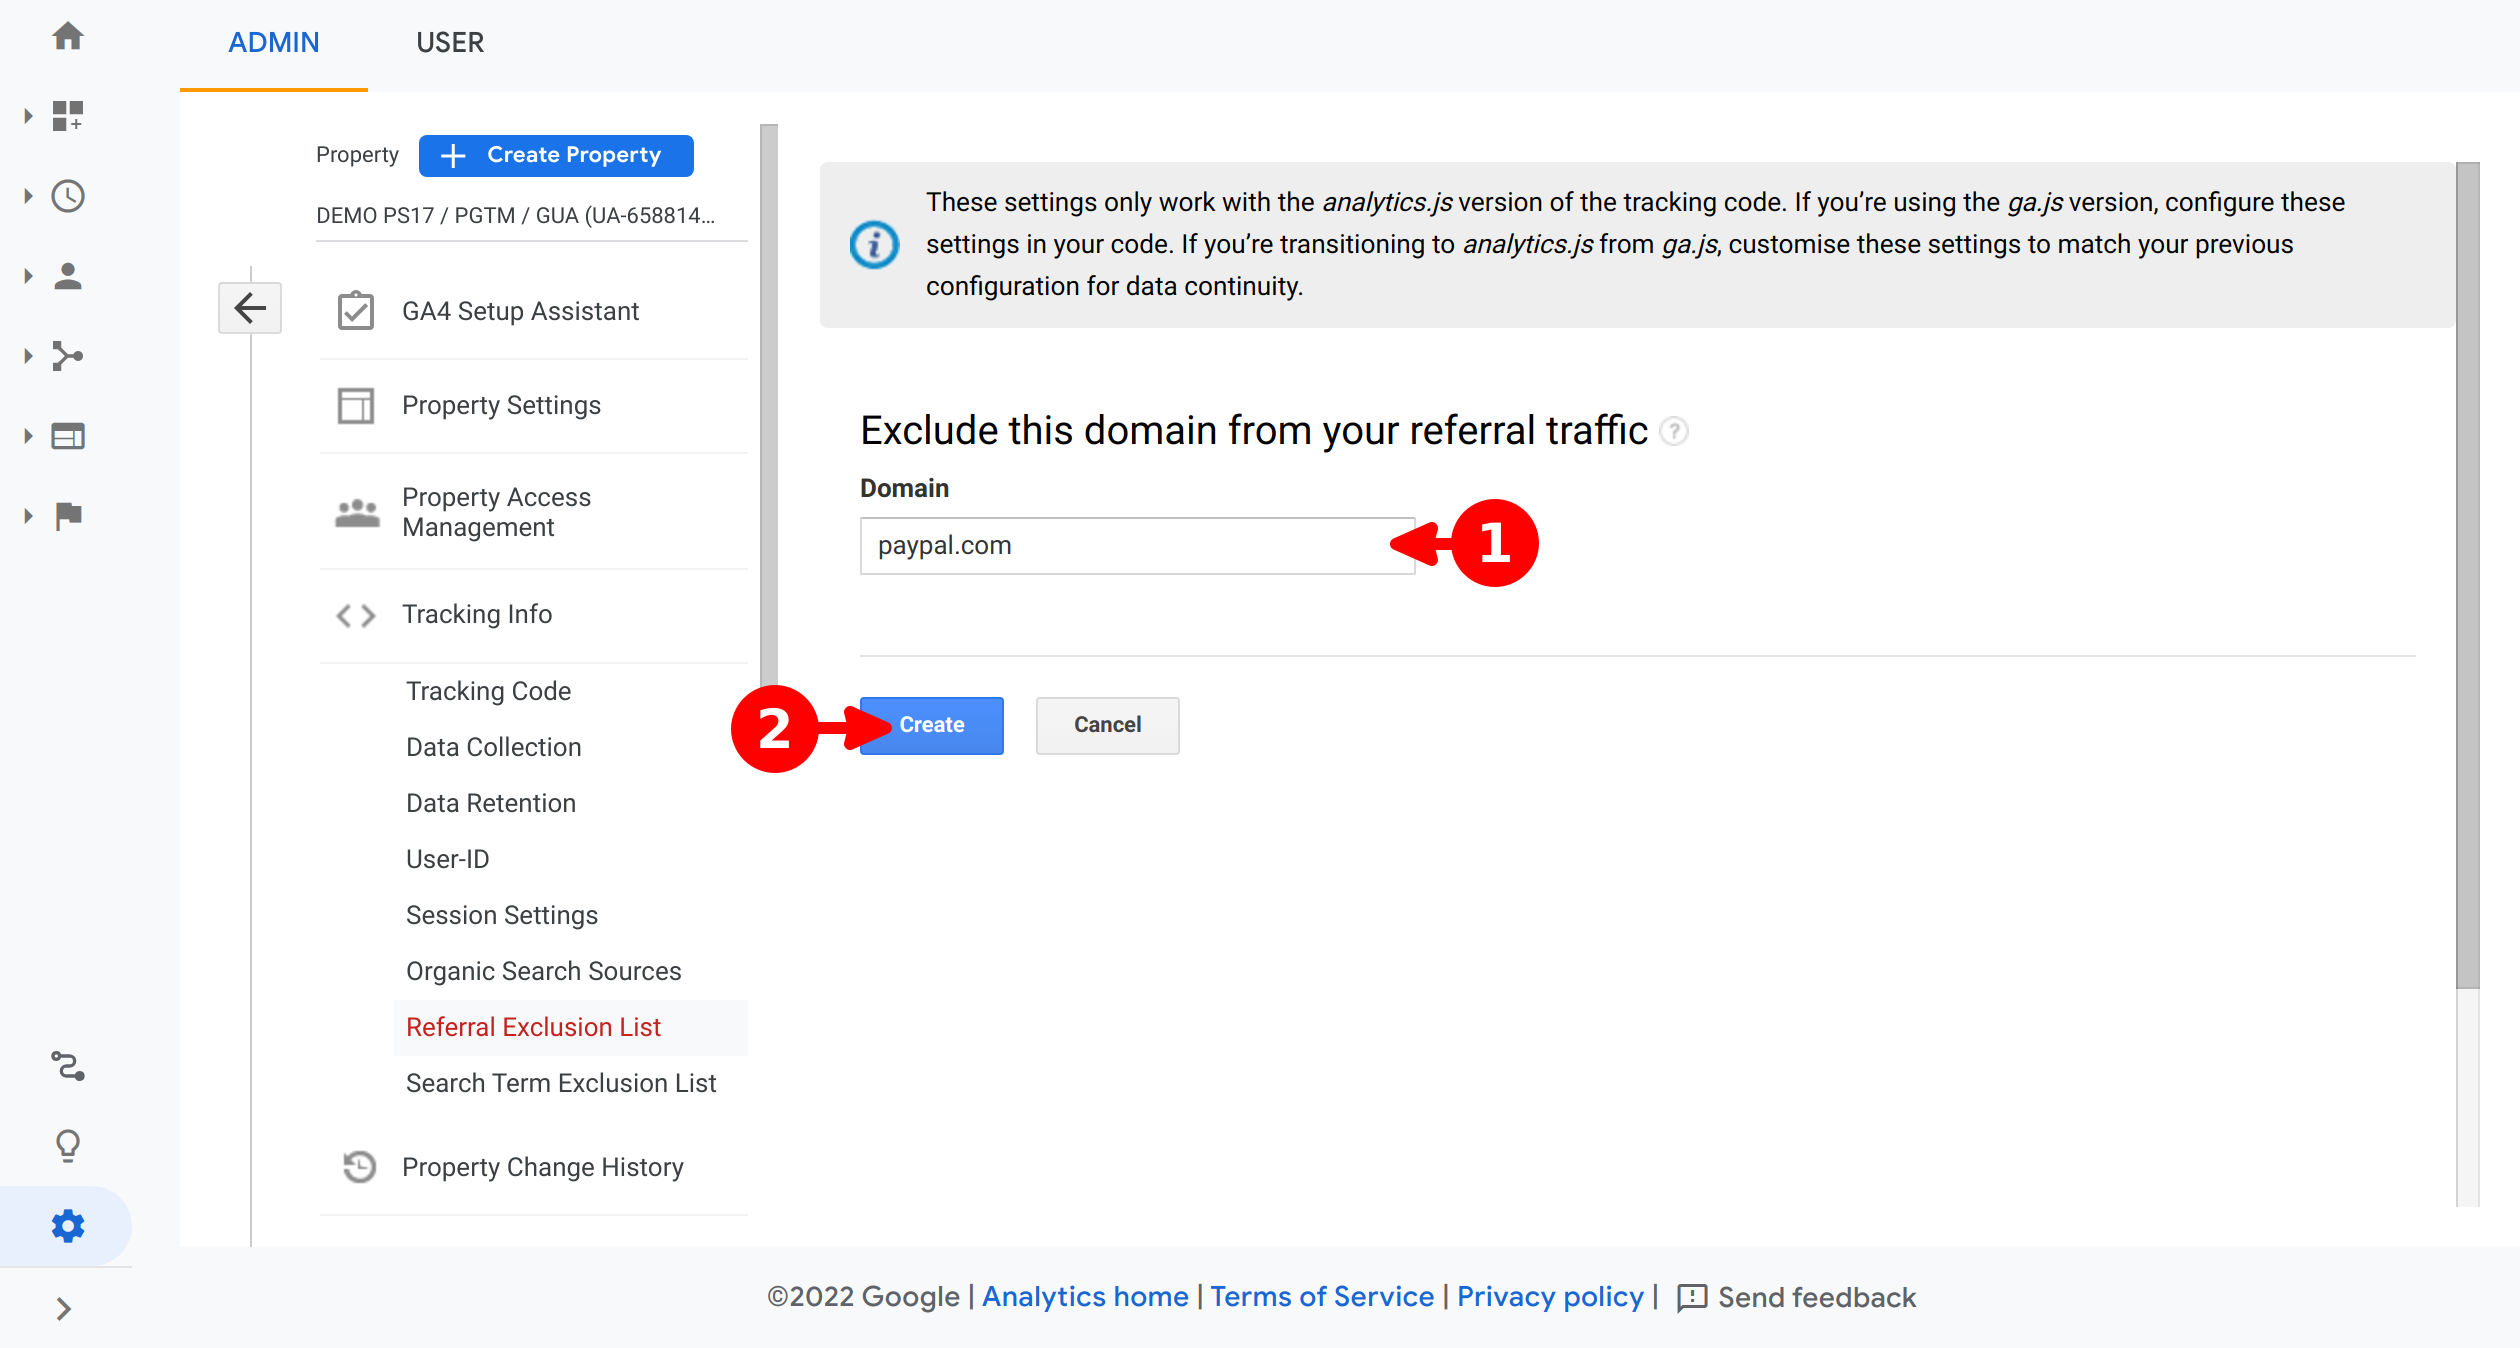
- Add the domain to exclude
- Click on Create
Tip
Add always the top level domain to avoid unexpected references (p.e. for payment.provider.com you should add provider.com)
Enhanced Ecommerce
In order to enable the Enhanced Ecommerce reports you have to follow the next steps.
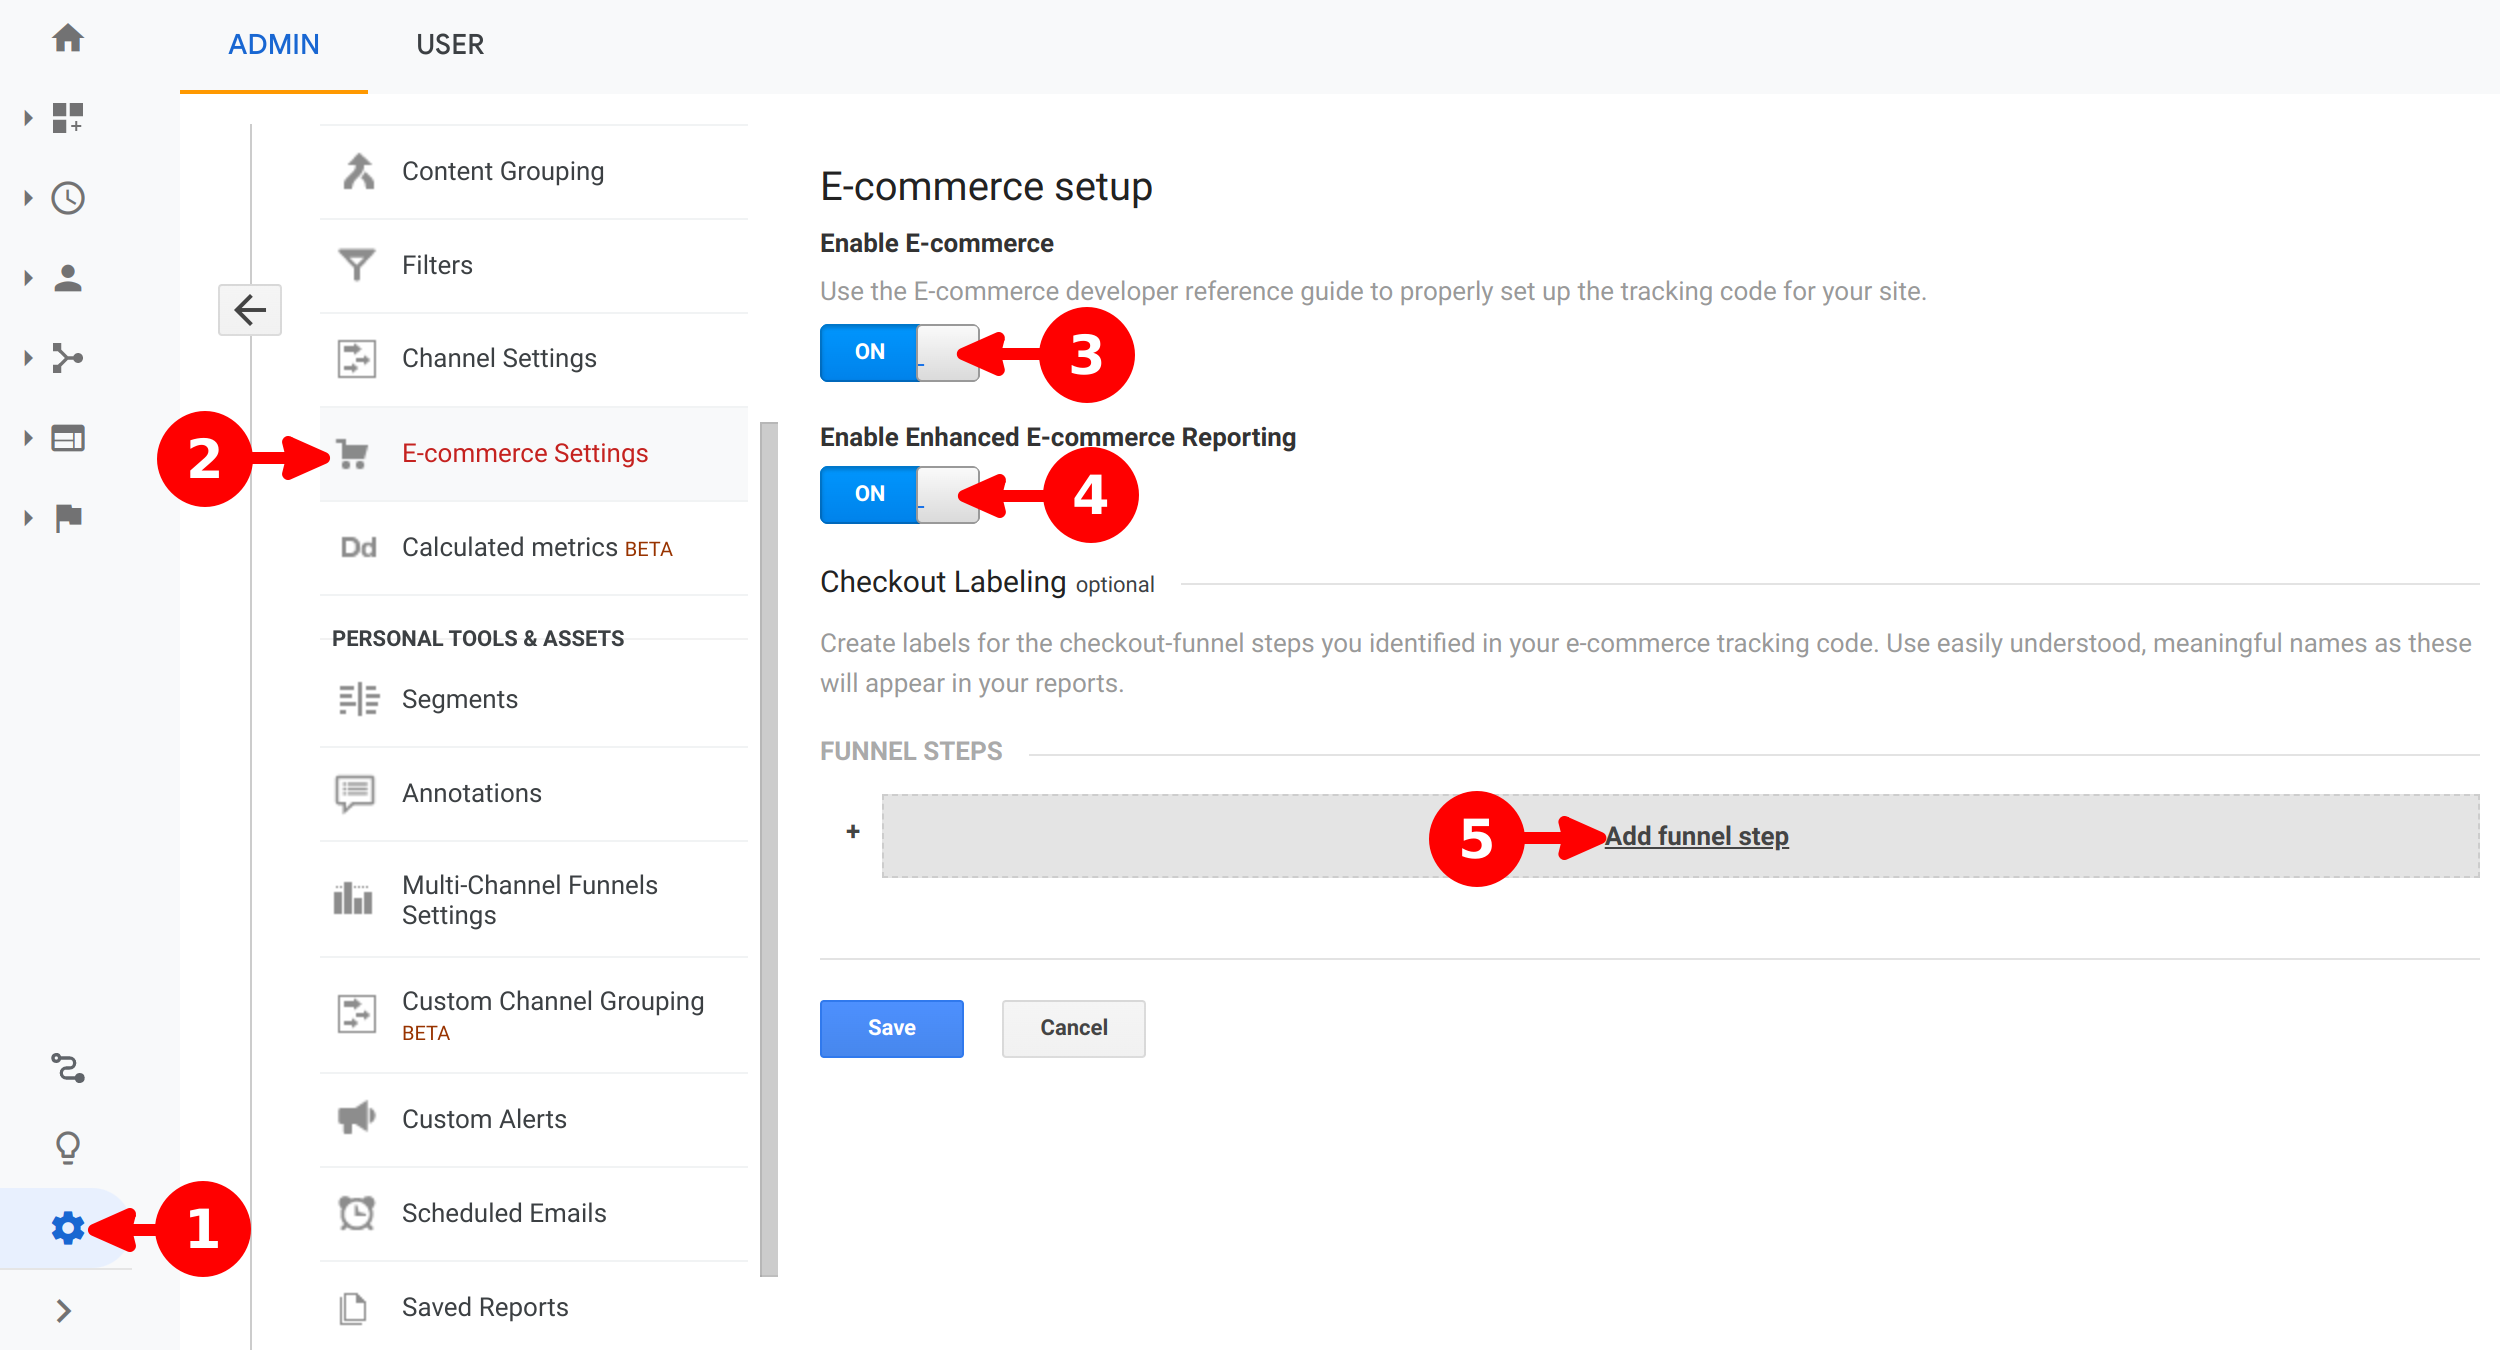
- Open the Admin panel
- On the View column, click on E-Commerce Settings
- Click on Enable E-Commerce button
- Click on Enable Enhanced E-Commerce Reporting button
- Click on Add funnel step to start defining the step names
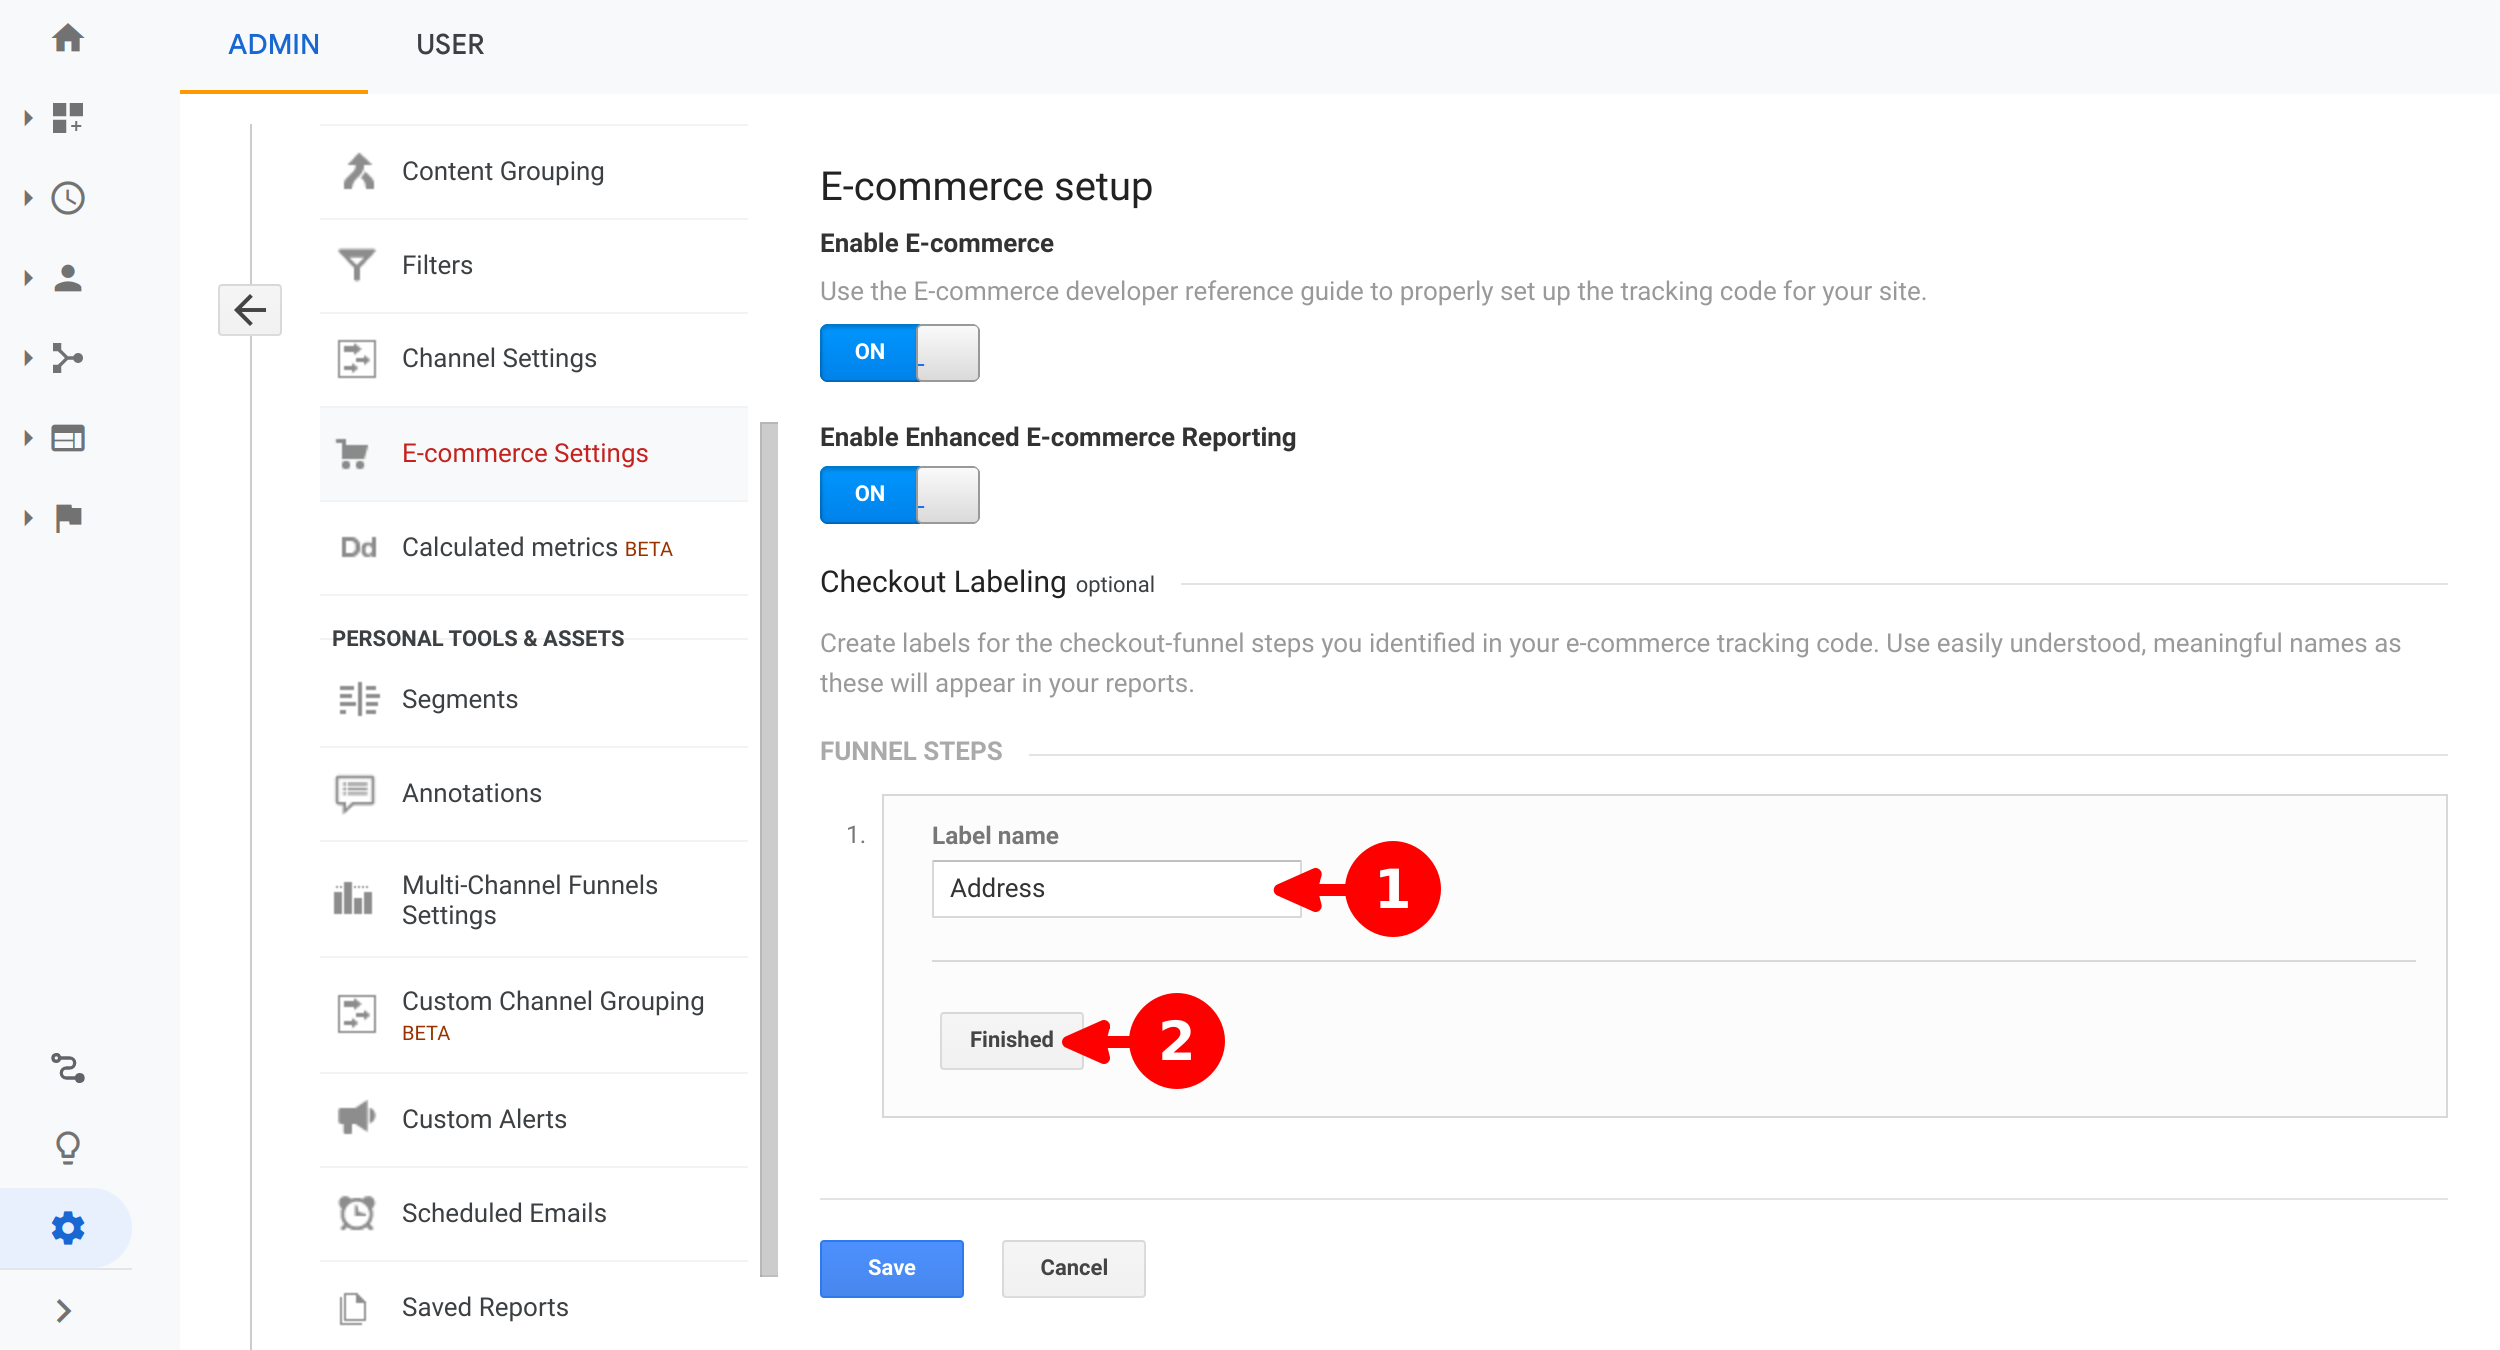
- Set a name to define the current funnel step
- Click on Finished
Recommended step names for the default PrestaShop Checkout methods
- Address
- Shipping
- Payment Method
Info
Address step is considered the beginning of the checkout funnel, due the Login step is skipped when the visitor has already logged in before start the checkout process
- One-step checkout
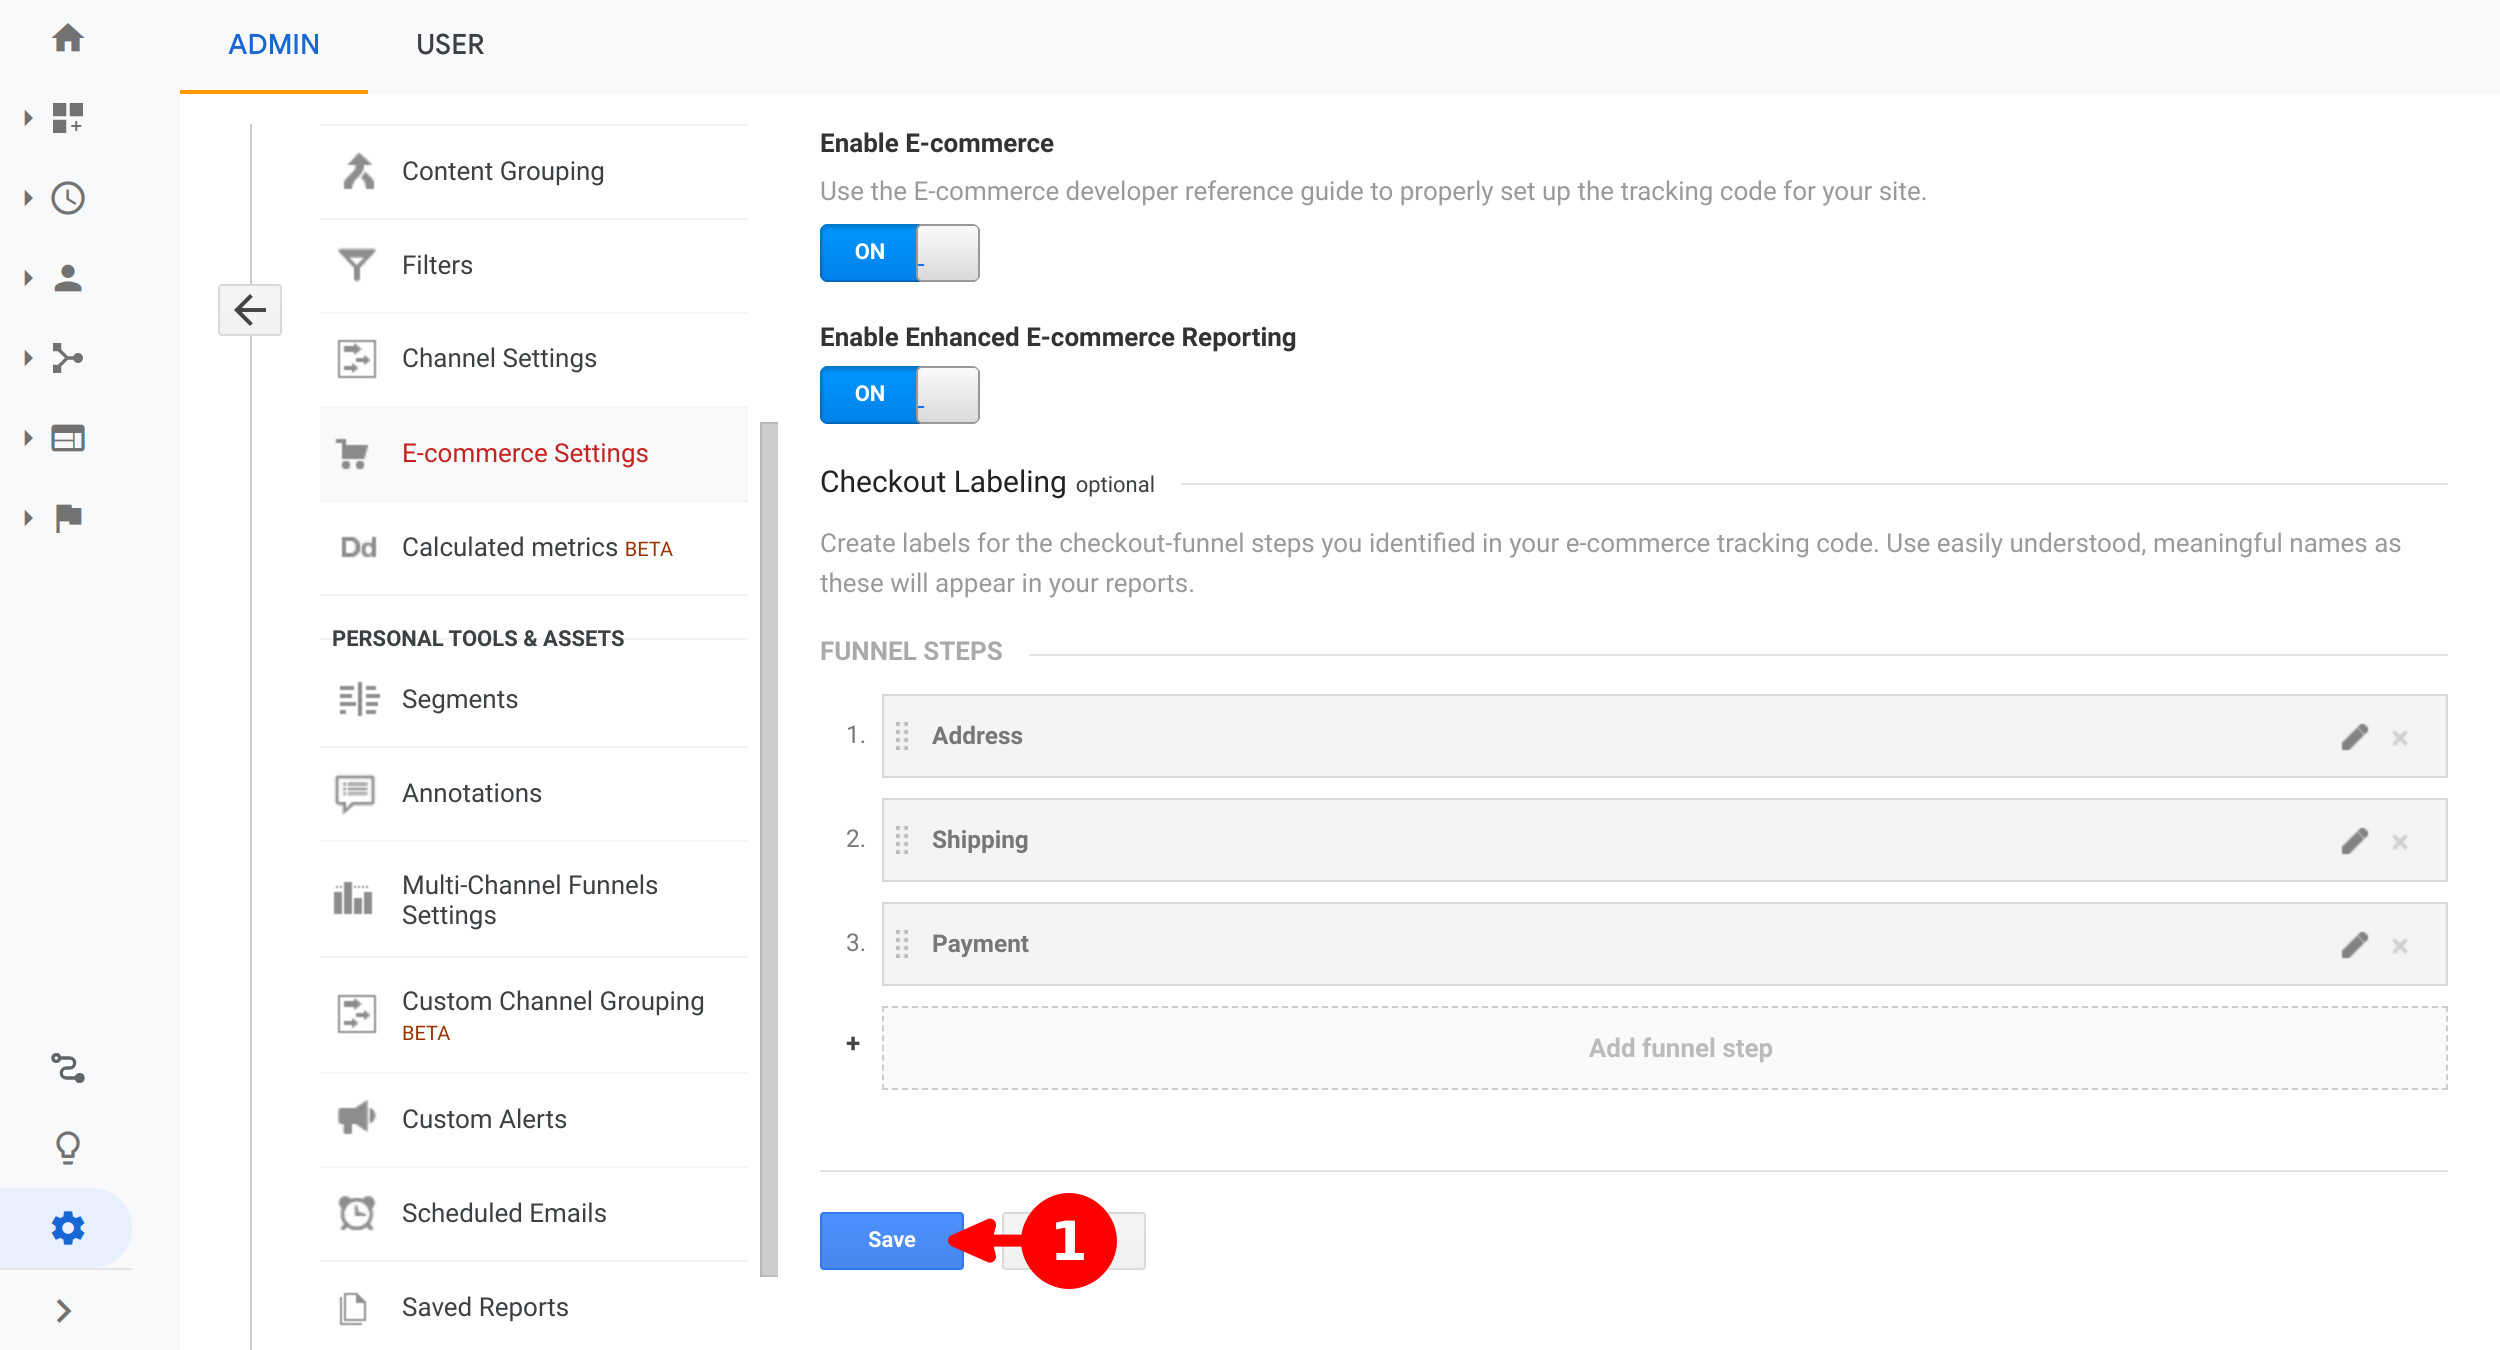
- Once you finished defining all checkout steps, click on Save button
Internal Promotions
Because there is no promotion module that has the necessary functionalities to track Enhanced Ecommerce, it is necessary to perform a specific integration and configuration in each promotion module.
The first part requires customizing the template in charge of displaying the promotion with a CSS class, in this way the tracking module will be able to detect when the promotion is displayed on the user's screen and the clicks made on the promotion.
The second part is to add some URL parameters in each promotion link, these parameters are the data that will be used to identify the promotion in the tracking reports.
Info
In order to complete this section, it is necessary to have basic knowledge of HTML
Template Customization
Before customizing the template it's recommended to perform an override in the modules folder of your theme, so if there is a new module update, the customizations will not be overwritten.
PrestaShop has a loading system that allows module customization within each theme, so it's possible to custom any module design for any theme.
The modules are installed by default in the folder /modules/module_name and the templates of a module should be located in /modules/module_name/views/templates.
The themes, have amodules folder that contains all modules with their custom templates, PrestaShop will check if exist any template file to override; whether not, will load the original module template. To make an override is required to mirror the module folder structure in modules theme folder.
Example
As example will take the ps_banner module, that have the templates on the module folder /modules/ps_banner/ will copy the file that renders the promotions ps_banner.tpl Replicate this folder structure on PrestaShop theme in the following way /themes/theme_name/modules/ps_banner/ and copy the file ps_banner.tpl to customize it.
Inside the file, look for the a element and include the class name js-track-promo to the ancestor element of a. Whether non exist an ancestor element, will require to create a div element with the class name js-track-promo as a wrapper of a element.
    <a class="banner" href="{$banner_link}">
      {if isset($banner_img)}
        <img src="{$banner_img}" alt="{$banner_desc}" title="{$banner_desc}">
      {else}
        <span>{$banner_desc}</span>
      {/if}
    </a>
    <div class="js-track-promo">
      <a class="banner" href="{$banner_link}">
        {if isset($banner_img)}
          <img src="{$banner_img}" alt="{$banner_desc}" title="{$banner_desc}">
        {else}
          <span>{$banner_desc}</span>
        {/if}
      </a>
    </div>
URL Parameters
The module is prepared to read URL parameters on promotion links to generate the view and click event, these parameters should have to be correctly added at URL definition inside module promotion.
Parameters List
| Parameter | Description |
|---|---|
pid |
Promotion ID |
pnm |
Promotion name |
cnm |
Creativity name |
csl |
Creativity Slot |
pps |
Promotion position |
The first parameter is separated from URL by ? symbol, between parameters are separated by & symbol.
Therefore, before add the promotion parameters, will have to know which separator are required.
http://www.myshop.com/es/5-apparel?pid=id_promo&pnm=apparel_offer&cnm=bycicle_boy&csl=wheel_second_img&pps=banner_home
http://www.myshop.com/es/5-apparel?q=size-s&pid=id_promo&pnm=apparel_offer&cnm=bycicle_boy&csl=wheel_second_img&pps=banner_home