Configure Google Ads API
This guide walks you through configuring Server-Side Conversion Tracking via the Google Ads API for your PrestaShop store. This setup ensures accurate conversion attribution by sending server-to-server data directly to Google Ads, bypassing browser-side blockers.
Note
The Google Ads API integration strictly recovers lost purchase conversions caused by ad blockers or unexpected failures in the checkout flow. The module features an internal deduplication system; if an order is successfully sent via the browser, the front-office script is blocked, preventing duplicate data submission.
Requirements
- Google Ads Manager Account (MCC): Required to request a Developer Token and access the Google Ads API Centre.
- Developer Token: Connects the module to the Google Ads API. It requires an assigned API access level (Basic Access) to process live production data.
- Google Cloud Project: Required to enable the Google Ads API, configure the OAuth consent screen, and generate the OAuth 2.0 Client ID and secret.
- Google Ads Client Account: The target advertising account for API calls. You need the 10-digit account number (e.g., 123-456-7890) and necessary operational permissions.
Create Ads Manager Account
Open your centralized management profile to oversee multiple individual advertising properties from a single master workspace.
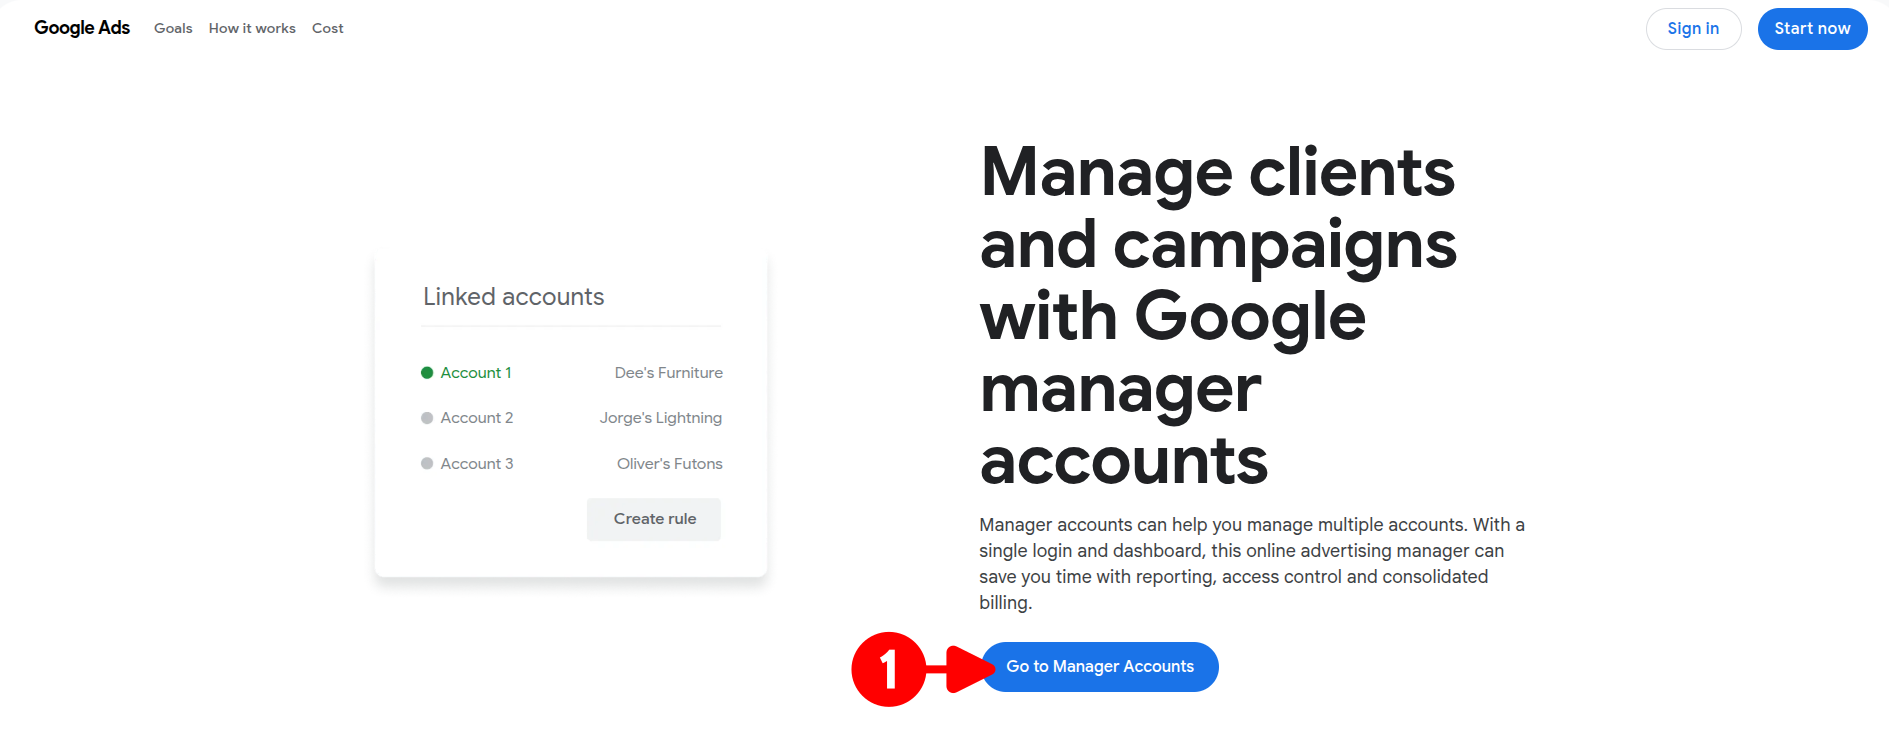
- Go to the Google Ads Manager Accounts landing page and click Go to Manager Accounts.
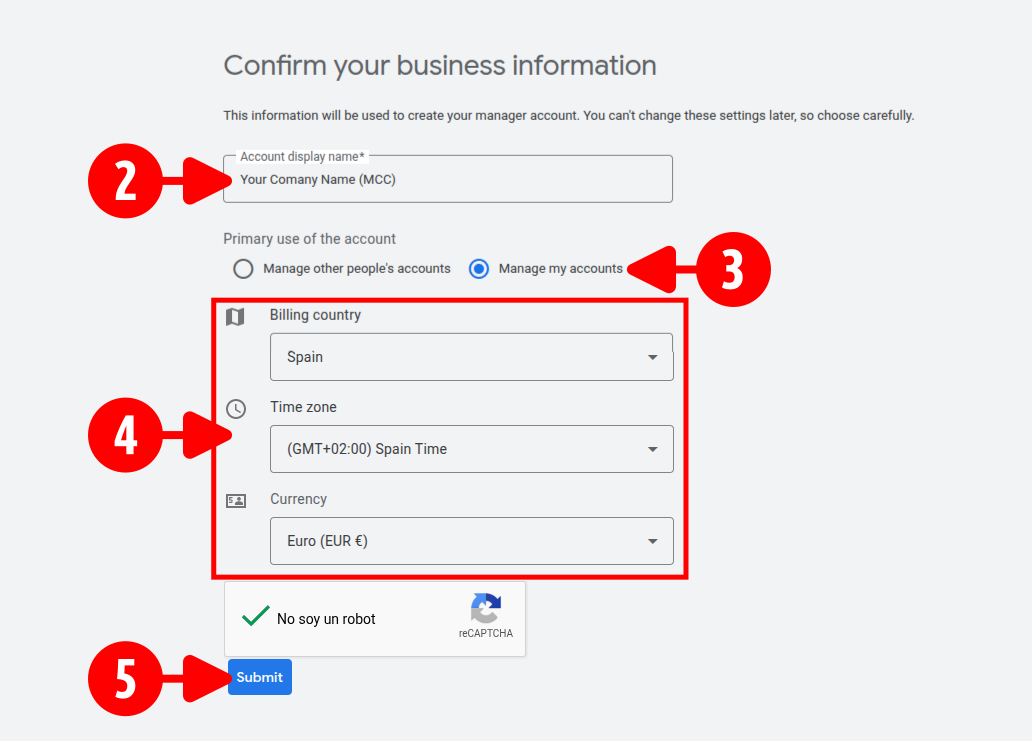
- Enter a clear title in the Account display name field (e.g.,
yourdomain.com MCC). - Select Manage my accounts as the primary account use.
- Select your specific local data for the Billing country, Time zone, and Currency fields.
- Complete the safety verification challenge and click Submit.
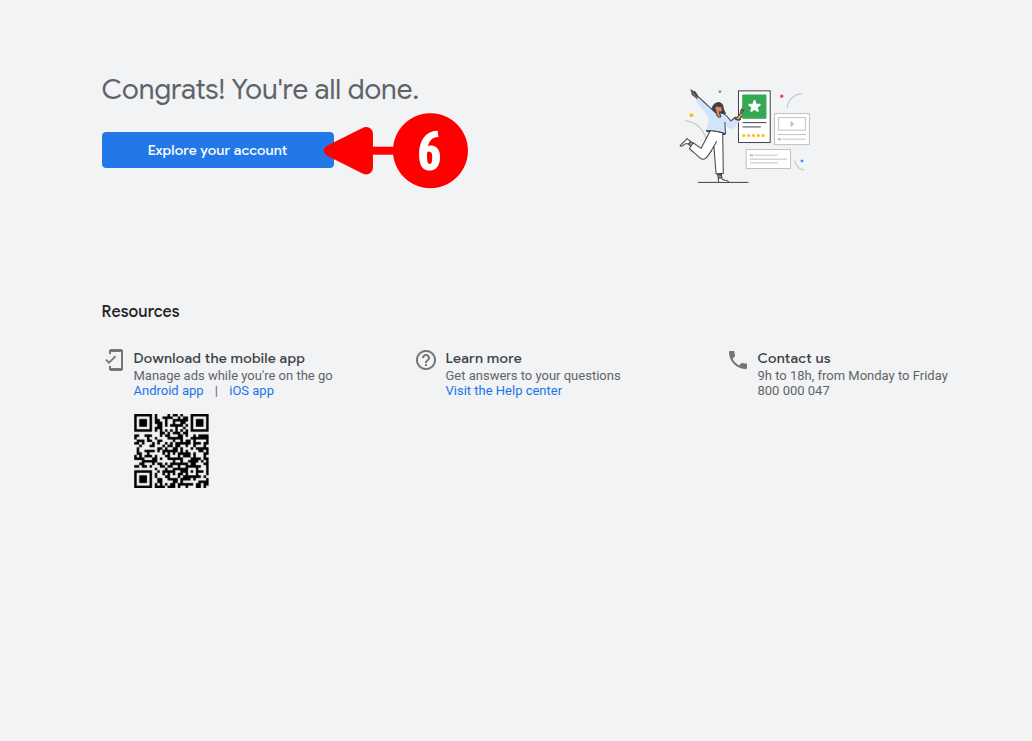
- Click Explore your account to open your new master tracking dashboard workspace.
Request Google Ads Developer Token
Generate a developer token inside your Manager Account (MCC) to authorize server-to-server API conversion synchronization.
- Click Admin from the left navigation menu.
- Click API centre
-
Complete the API Access registration form using your business data:
- API contact email: Enter your primary business email (e.g.,
yourcontact@yourdomain.com). - Company name: Enter your registered corporate entity name.
- Company URL: Enter your main e-commerce storefront address (e.g.,
https://yourdomain.com). - Company type: Select the Advertiser option.
- Intended use: Enter a direct tracking description (e.g.,
Recover lost conversions due to ad blockers). - Principal place of business: Select your country location from the dropdown menu.
- API contact email: Enter your primary business email (e.g.,
-
Check the Yes, I agree to the above Terms and Conditions agreement checkbox.
- Click Create token.

- Click View token inside the newly generated Developer token panel block to uncover your active token string.

Explorer Access Daily Operational Quota
Newly generated tokens receive Explorer access automatically, which provides an operational budget of 2,880 API operations per day. This volume is sufficient for standard e-commerce event streams and server-side tracking. Monitor your daily request volume; if your high-traffic storefront requires more daily operations, click Apply for Basic Access or upgrade to Standard Access within your API centre dashboard to lift the rate limit.
Module Configuration
Map the generated token string into your PrestaShop store back office panel to link your backend server tracking engine.
- Open your PrestaShop module configuration interface.
- Click the Google Ads tab from the left menu.
- Paste the copied alphanumeric string directly into the Manager Developer Token input field.
- Click Save.
Google Cloud Project
Setting up a Google Cloud Project establishes a secure environment to authenticate and authorize server-to-server data transmission between your store and the Google Ads API.
Prerequisite Account
This guide assumes you already possess an active Google Cloud account and are currently logged into the console.
Create Project
Initialize a dedicated workspace within Google Cloud to house your API credentials.
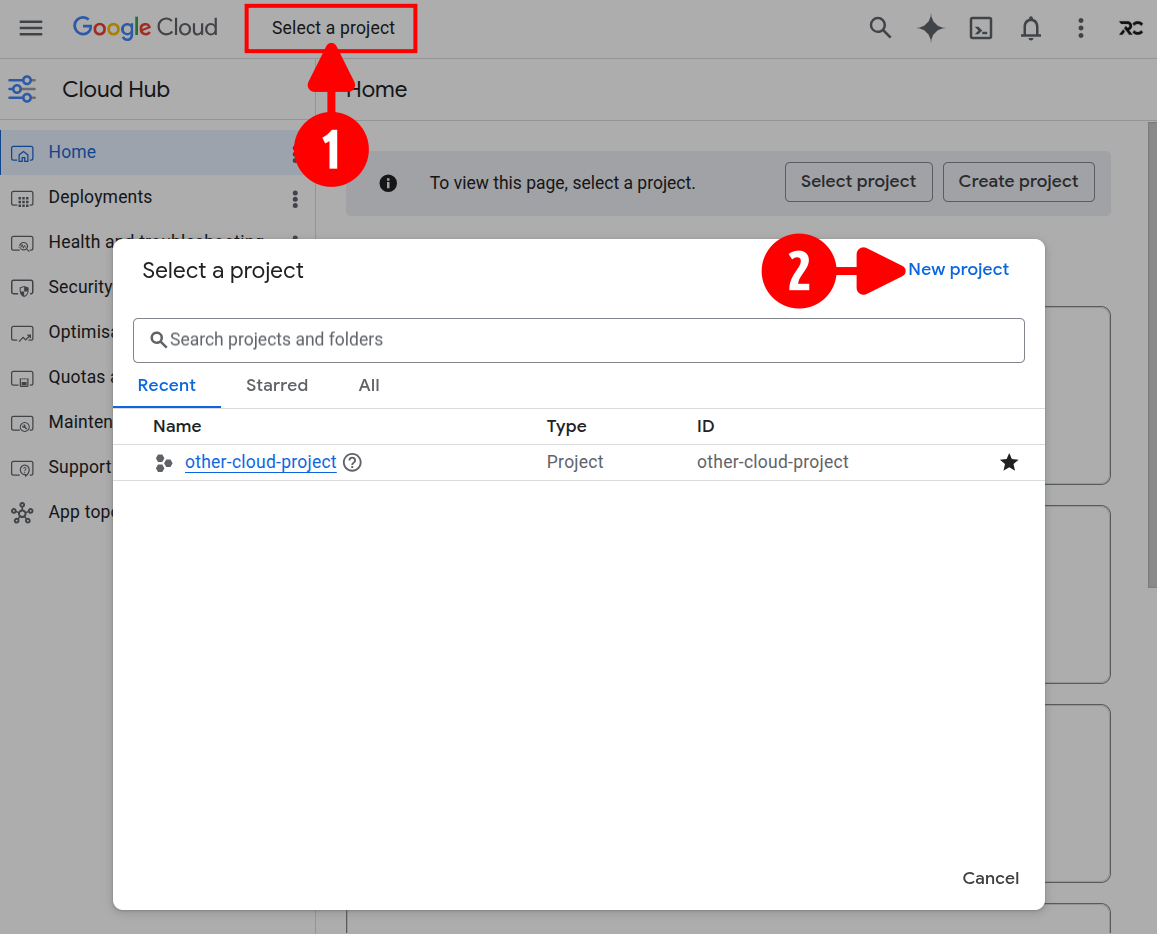
- Open the project dropdown menu from the top navigation bar.
-
Click New project.
-
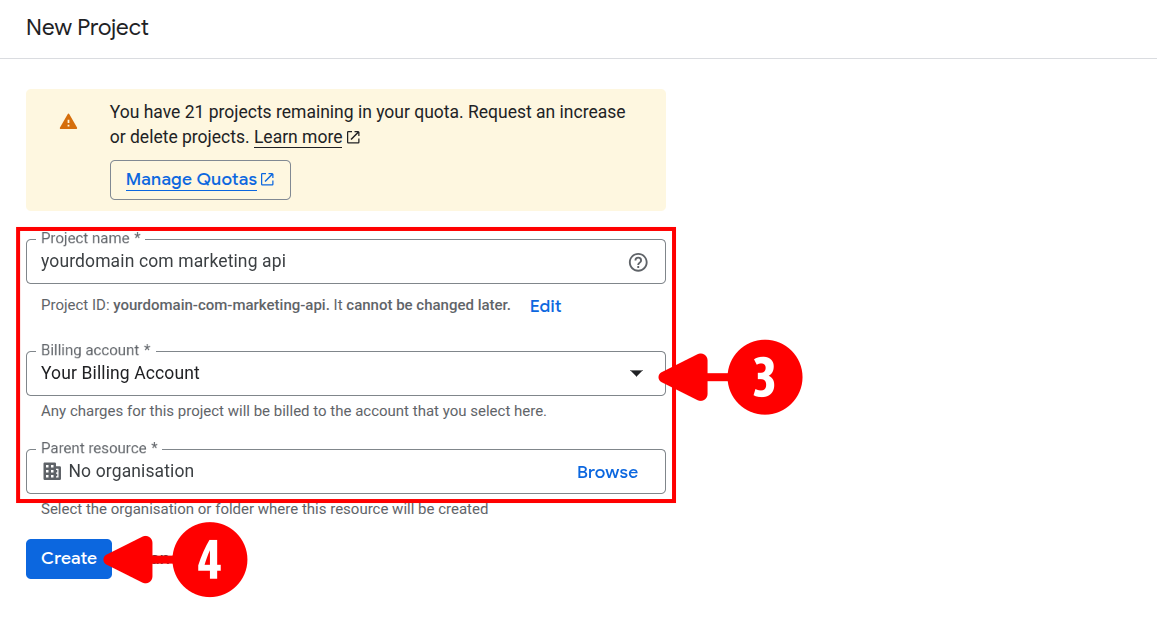
Enter a descriptive Project name (e.g.,
yourdomain com marketing api) and verify your billing account. -
Click Create.
Enable API
Activate the Google Ads API service for your newly created project to allow data synchronization.
-
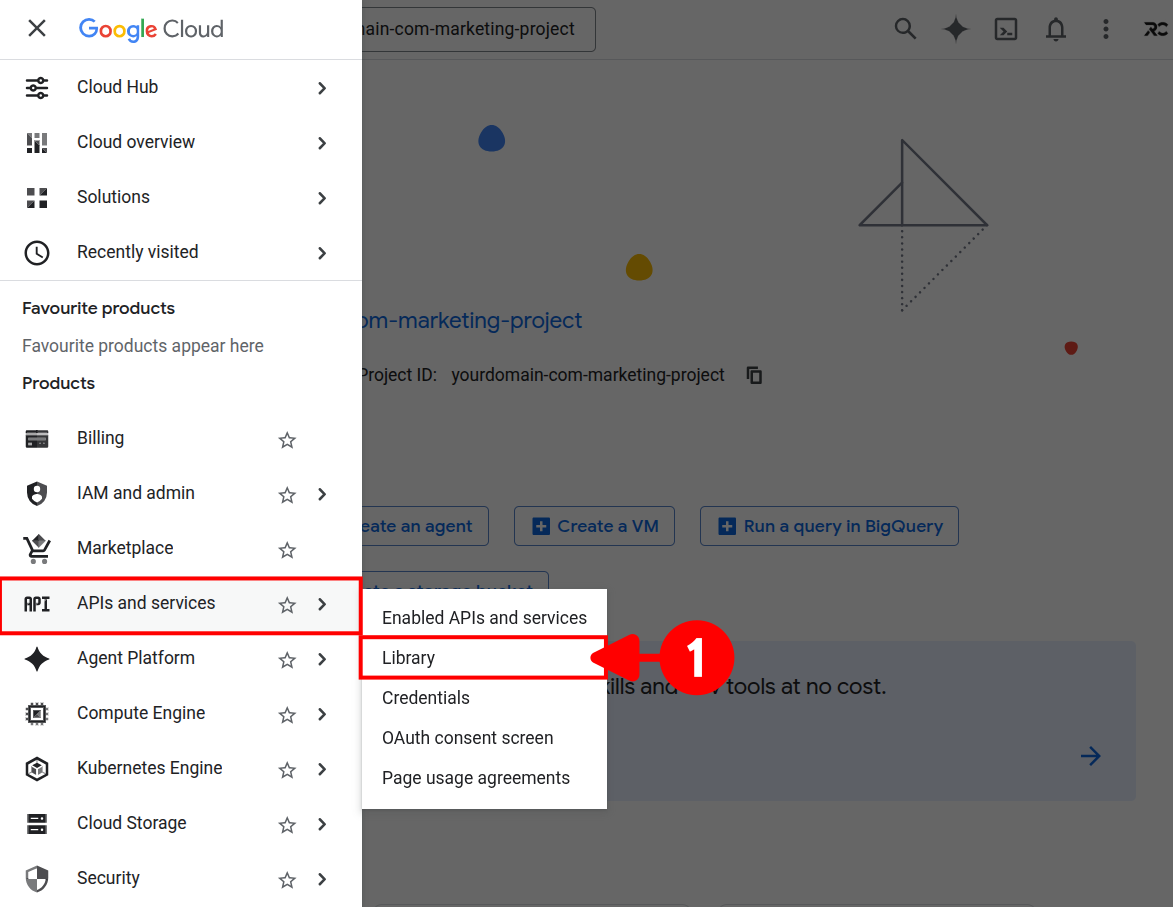
Open the left navigation menu and navigate to APIs & services > Library.
-
Search for
google ads apiwithin the API Library search bar.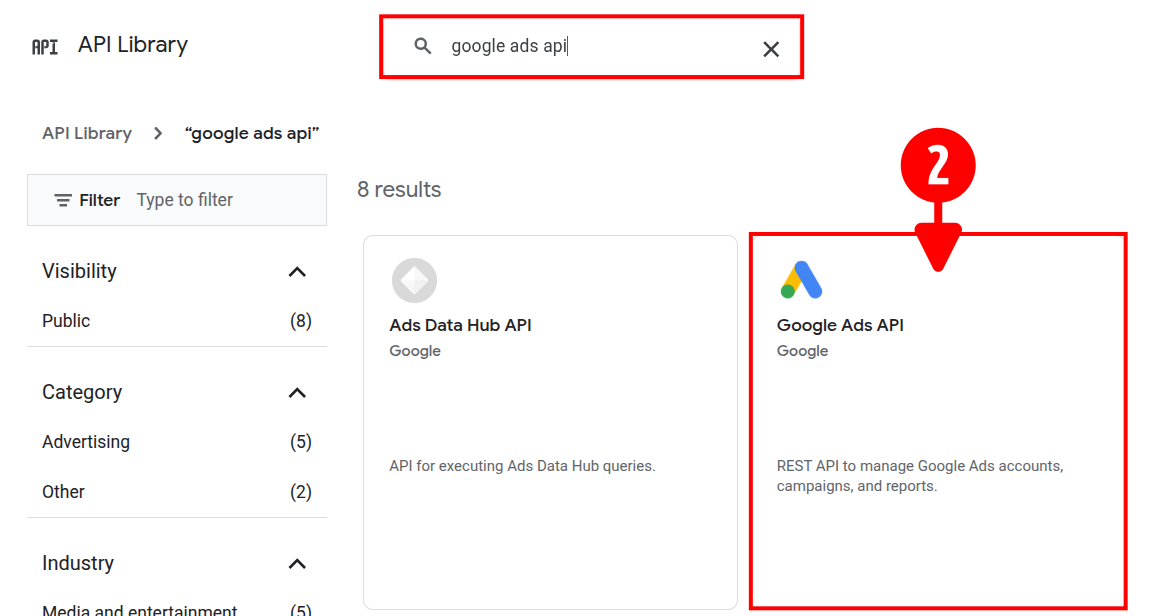
-
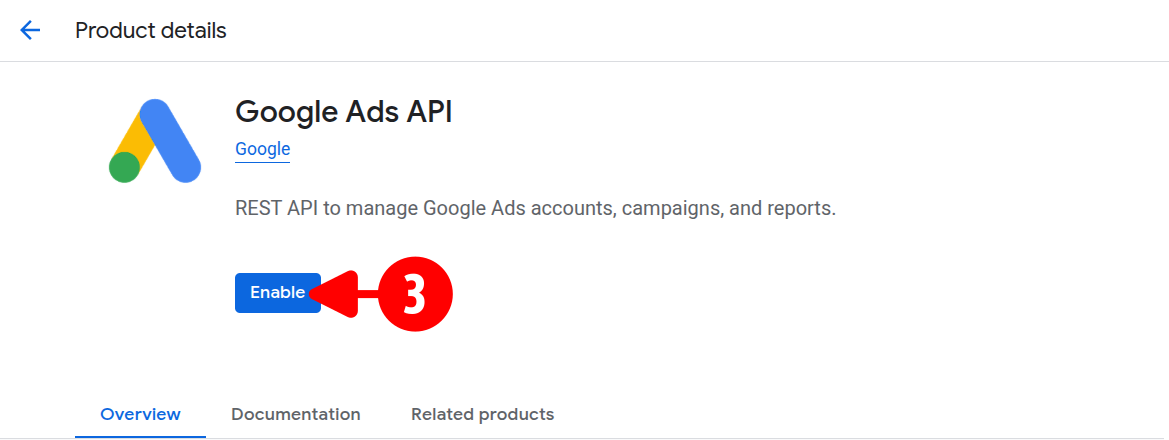
Click the Enable button on the Google Ads API product details page.
Configure OAuth Consent
Set up the OAuth consent screen to define the application identity and user permissions.
-
Navigate to the OAuth consent screen section
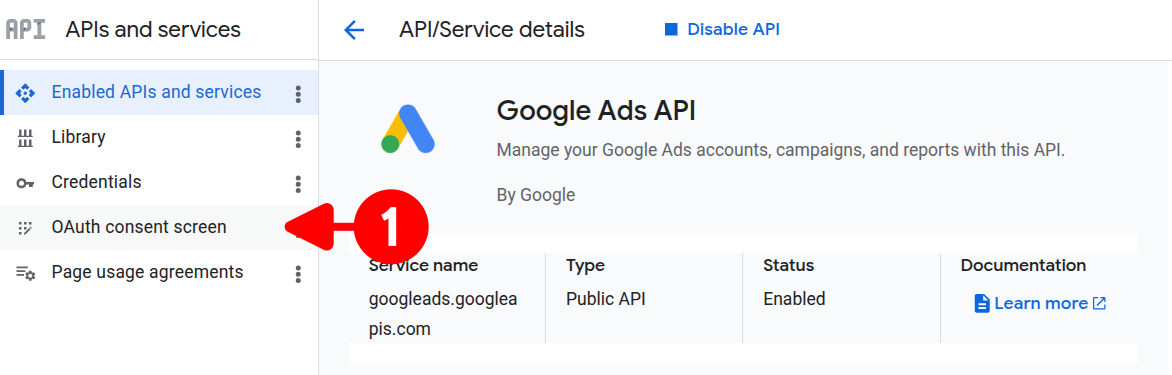
-
Click Get started.
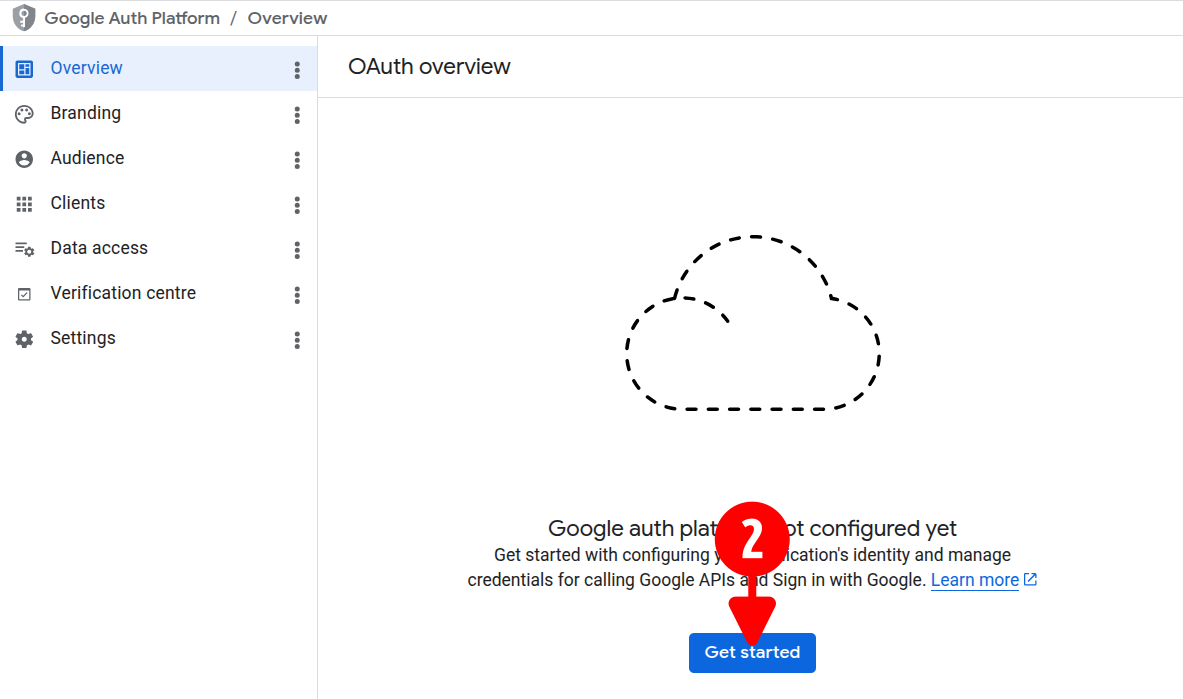
-
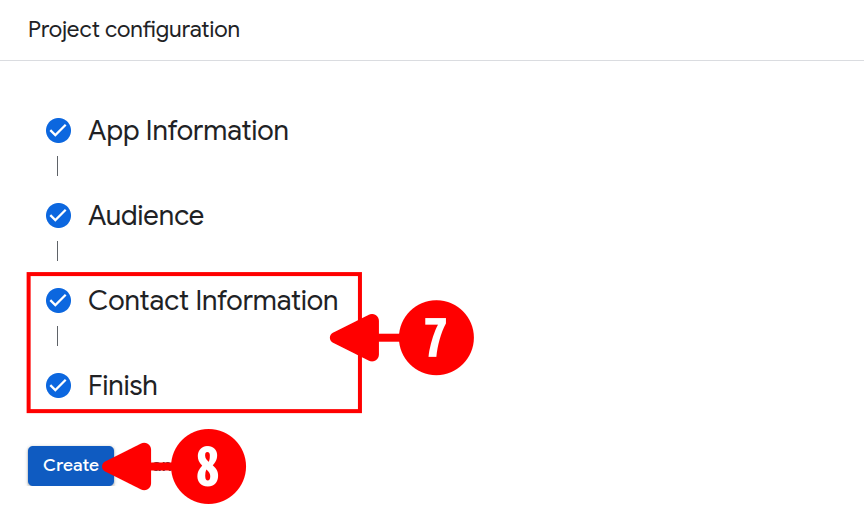
Fill in the required application and contact information
-
Click Next.
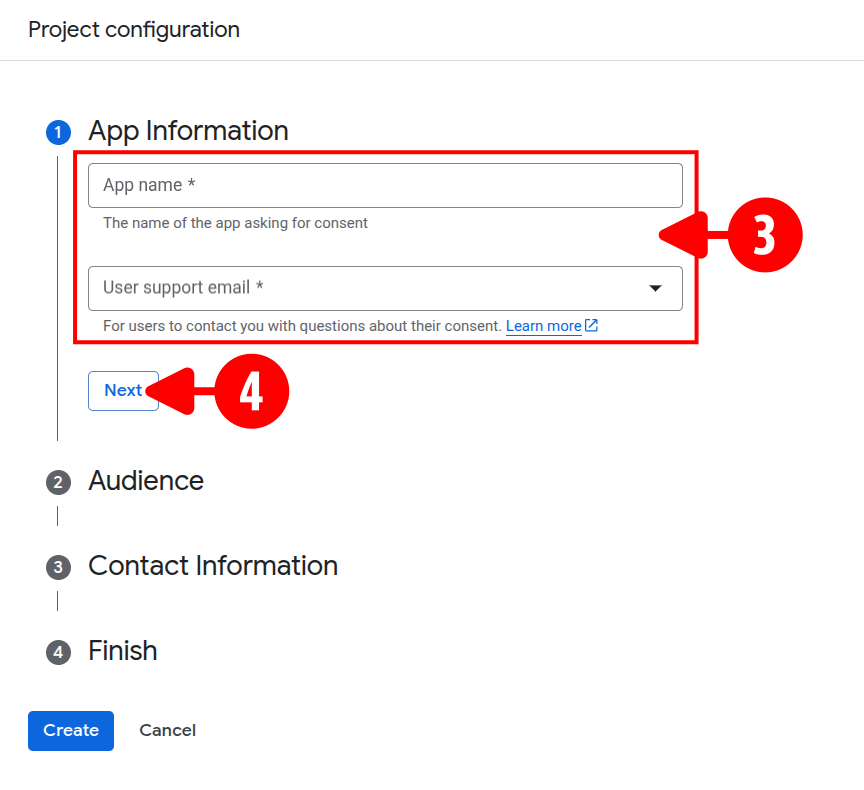
-
Select the External audience type to allow your application to connect externally.
-
Click Next.
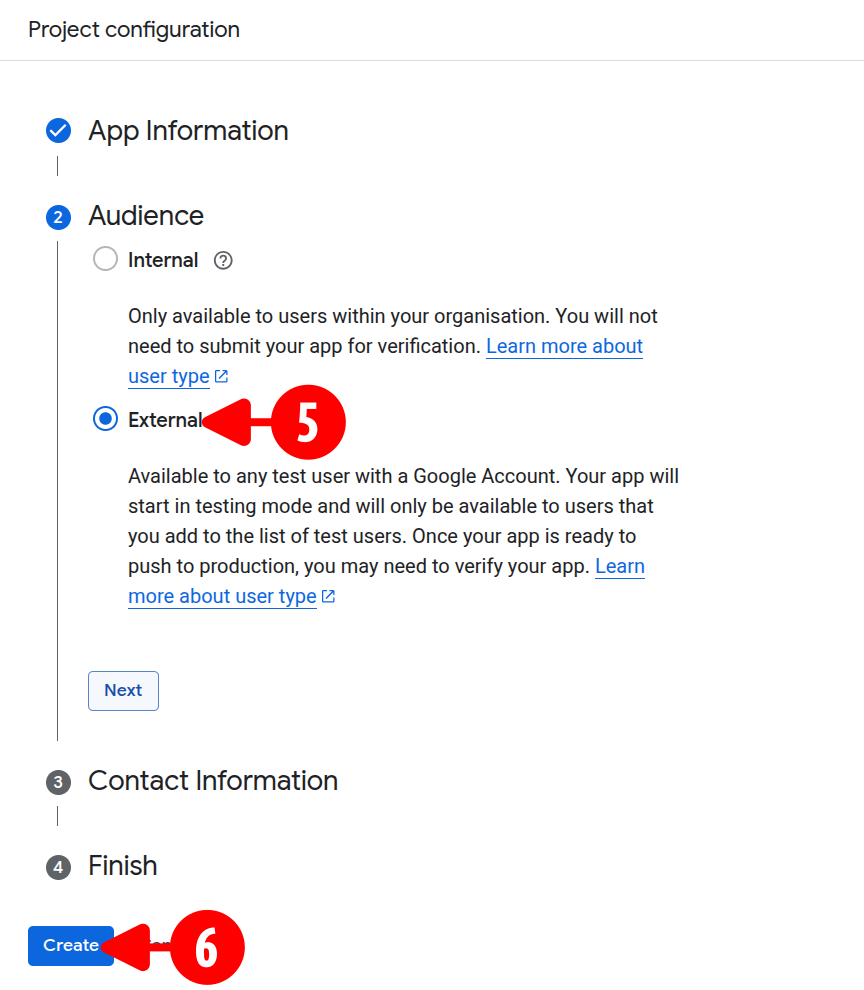
-
Add the contact information and agree the Google API services user data policy.
-
Click Create to finalize the consent screen.
Configure Audience
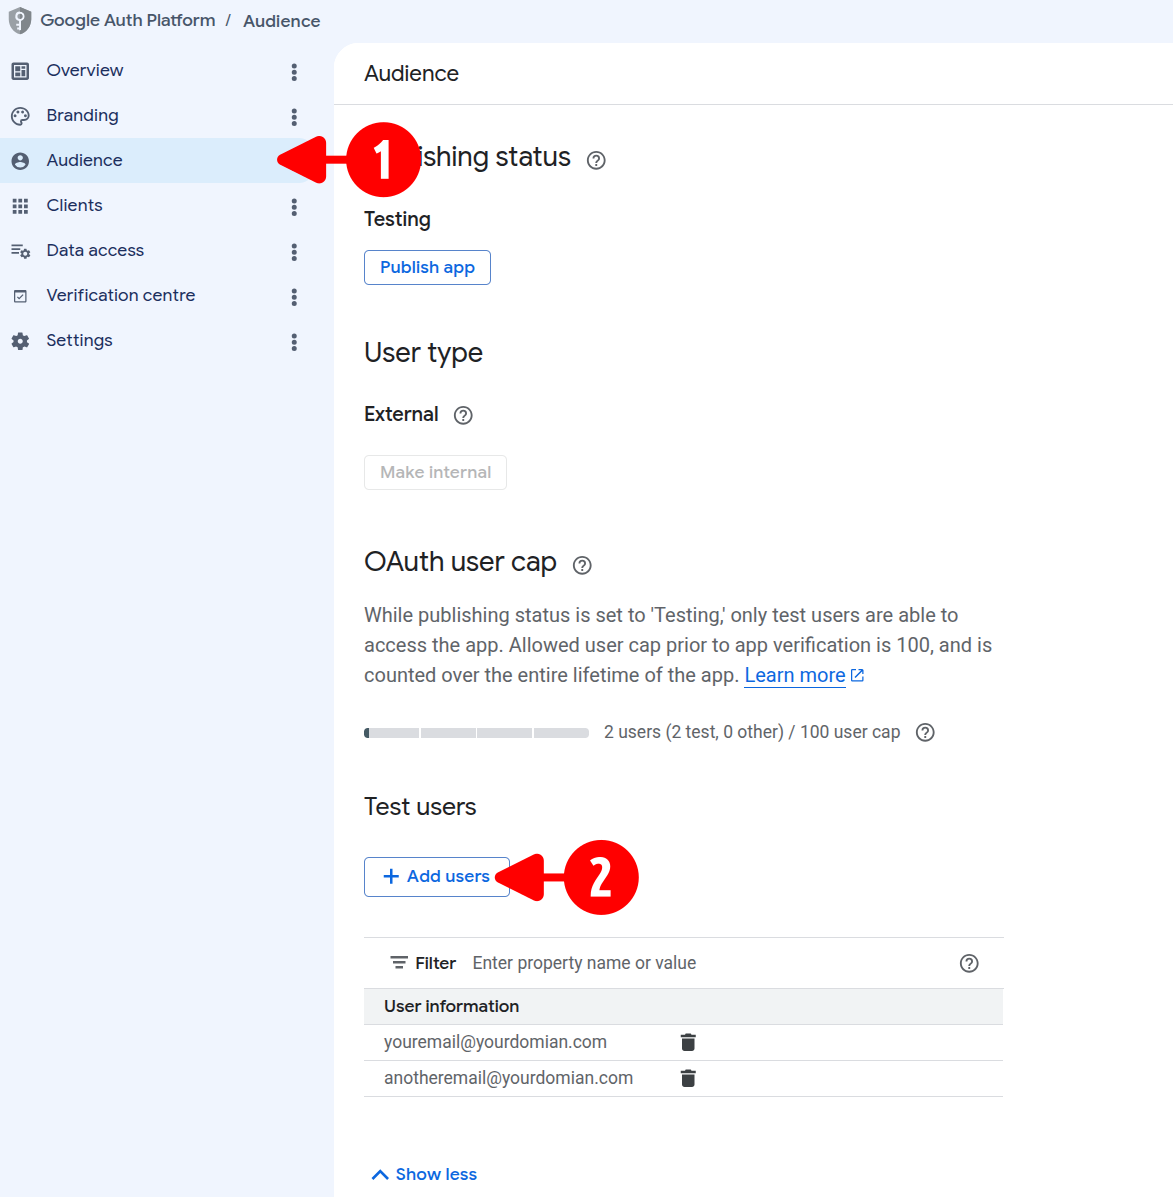
Add the email address associated with your Google account as a test user to allow authentication during development.
- Navigate to the Audience
-
Click Add users.
-
Enter the email address associated with your Google Ads MCC account and click Add.
Publish Application
You can publish your application to production after completing the configuration and testing phases. However, for development and testing purposes, adding your email as a test user allows you to authenticate and retrieve tokens without publishing.
Generate OAuth Credentials
Create the specific client credentials required to connect your module securely.
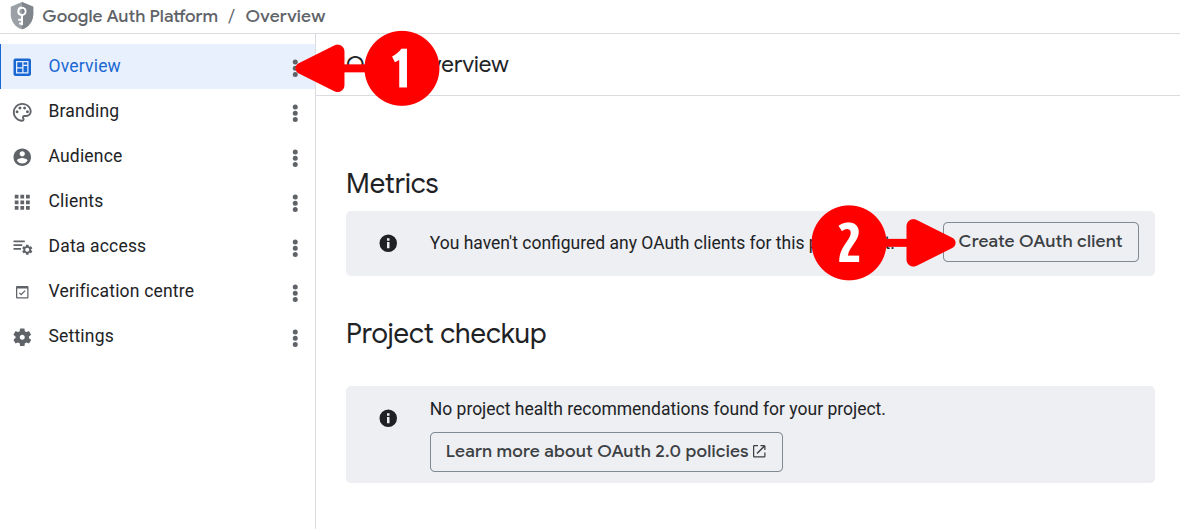
- Navigate to the Overview
-
Click Create OAuth client.
-
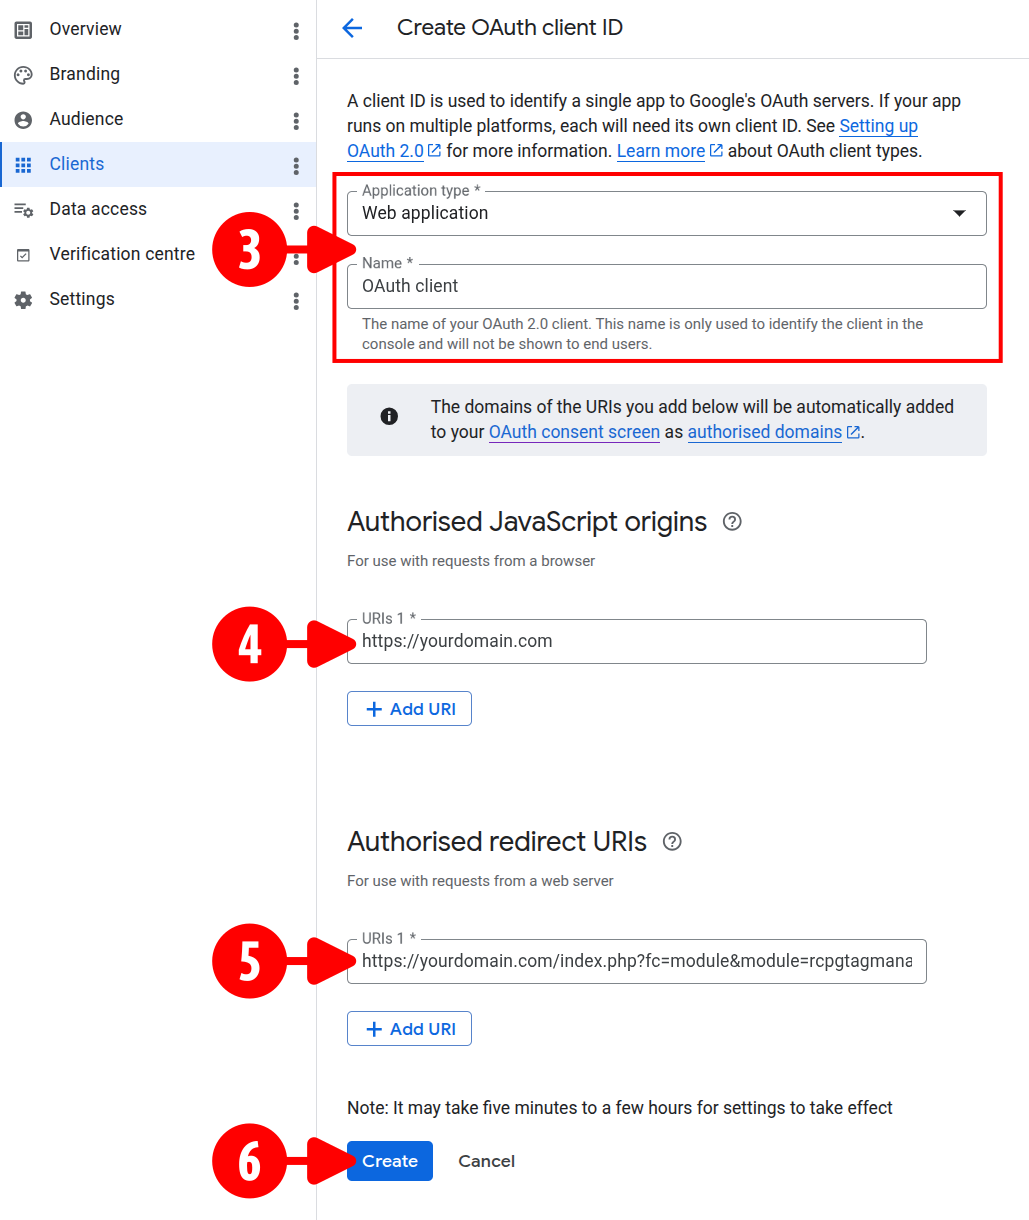
Select Web application as the application type and enter a recognizable name.
- Enter your main domain (e.g.,
https://yourdomain.com) under the Authorised JavaScript origins section. - Paste the authorized redirect URL copied from your module configuration's Google API tab into the Authorised redirect URIs field.
-
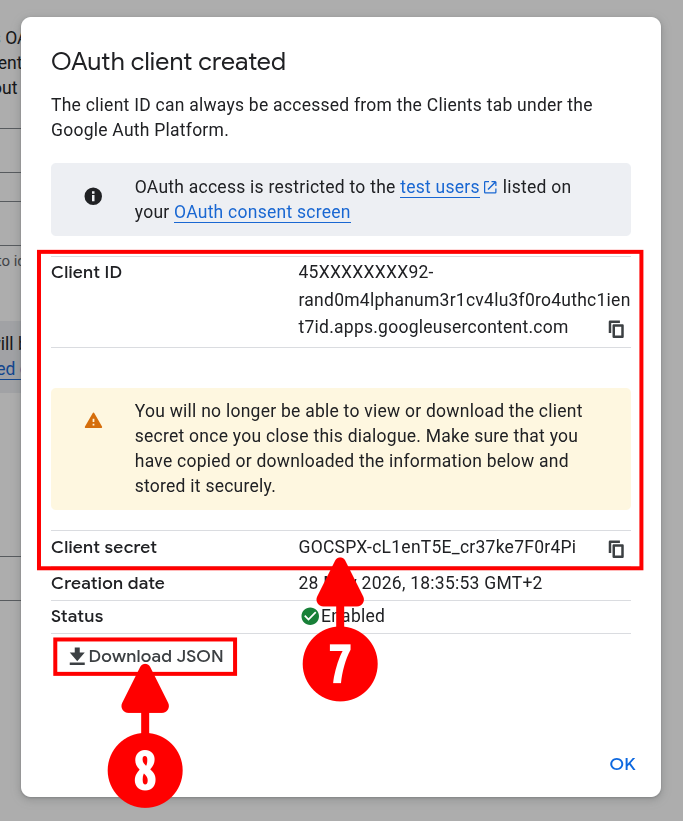
Click Create to generate your keys.
-
Copy the generated Client ID and Client Secret values to map them into your module configuration.
-
Click Download JSON to save a file containing your credentials and store it securely for future reference.
Module Configuration
Map your newly generated Google Cloud credentials to the PrestaShop module to finalize the authentication bridge.
-
Open your PrestaShop module configuration interface and click the Google API tab.
-
Paste your copied Client ID and Client Secret into their respective input fields and click Save.
-
Click the newly activated Get Authorization Token button to authenticate and retrieve your authorization token.
Credential Security
Never share your Client Secret publicly. Keep your downloaded JSON file secure to prevent unauthorized API access.
Scope Data Access
Grant your application the necessary permissions to securely manage and transmit data by adding the sensitive Google Ads API scope.
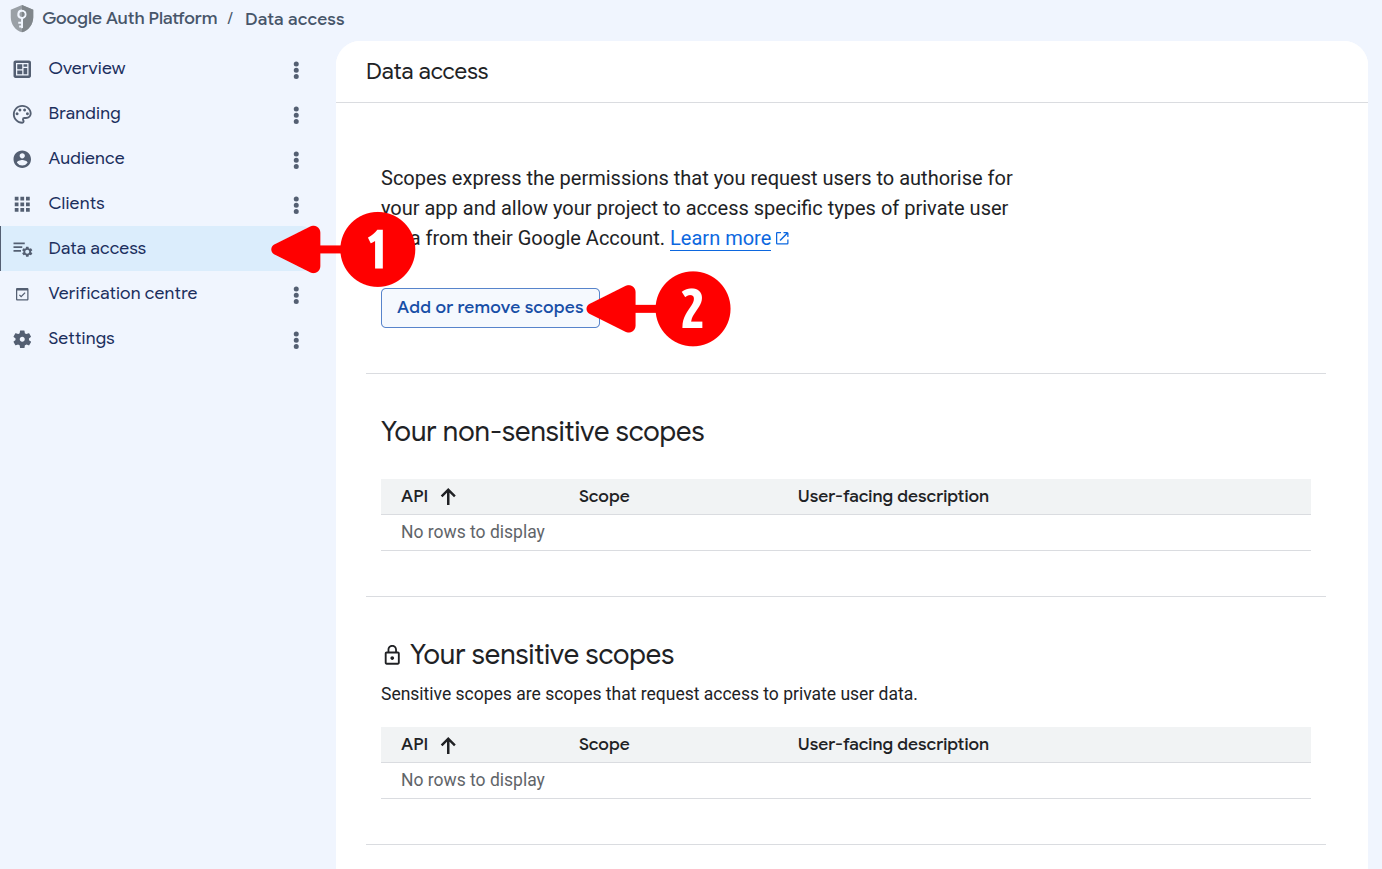
- Navigate to the Data Access section
- Click Add or remove scopes within the Scopes configuration step of your OAuth consent screen setup.
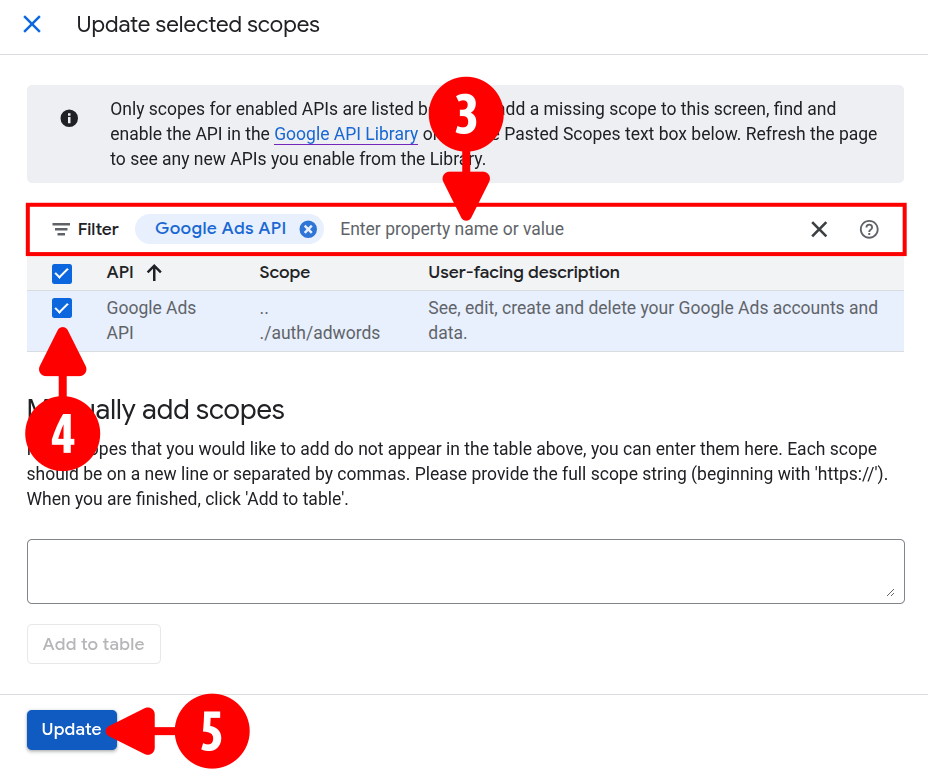
- Search for
Google Ads APIwithin the filter bar. - Check the box next to the Google Ads API scope entry.
- Click Update.
-
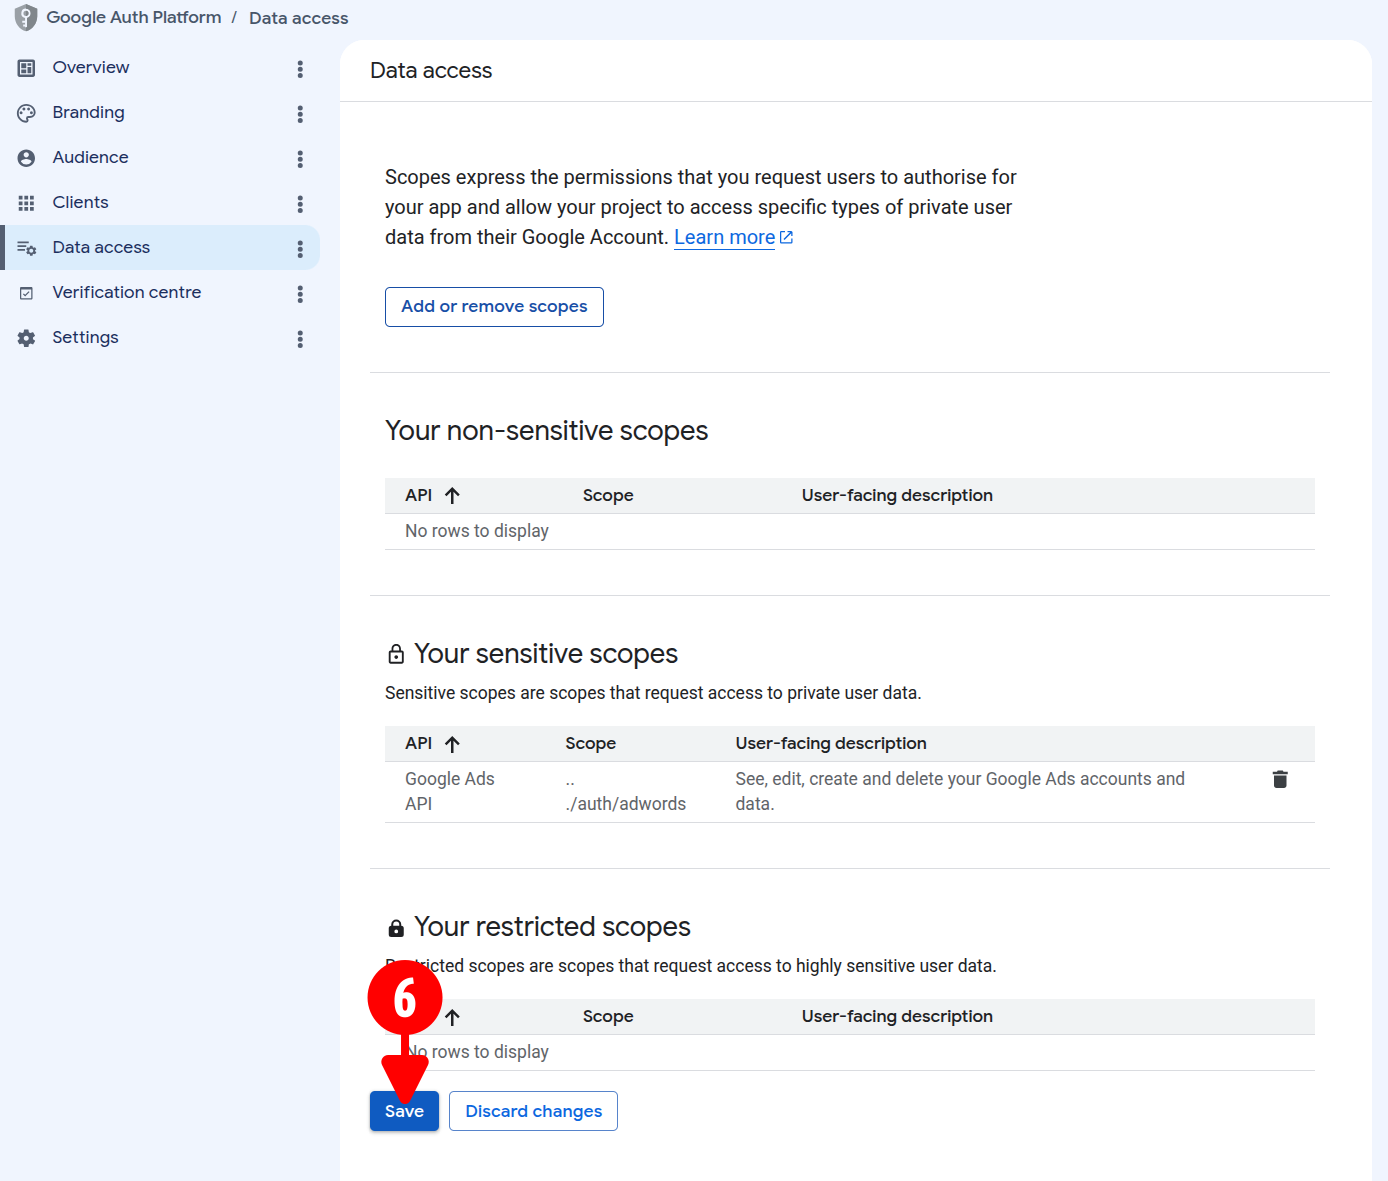
Click Save to apply the permissions.
Google Ads API Conversion
Create a dedicated offline conversion action to receive server-side purchase events directly from your PrestaShop store.
Synchronization period
After creating a new conversion action, allow up to 6 hours for the Google Ads system to fully initialize the new configuration across its servers. During this time, API calls referencing the new conversion may not be processed correctly with response TOO_RECENT_CONVERSION_ACTION.
Create Conversion Action
Configure the conversion parameters within your Google Ads account to accept offline API data.
- Navigate to Goals > Conversions > Summary and click New conversion action.
-
Select the Conversions offline tracking option and click Edit data sources.
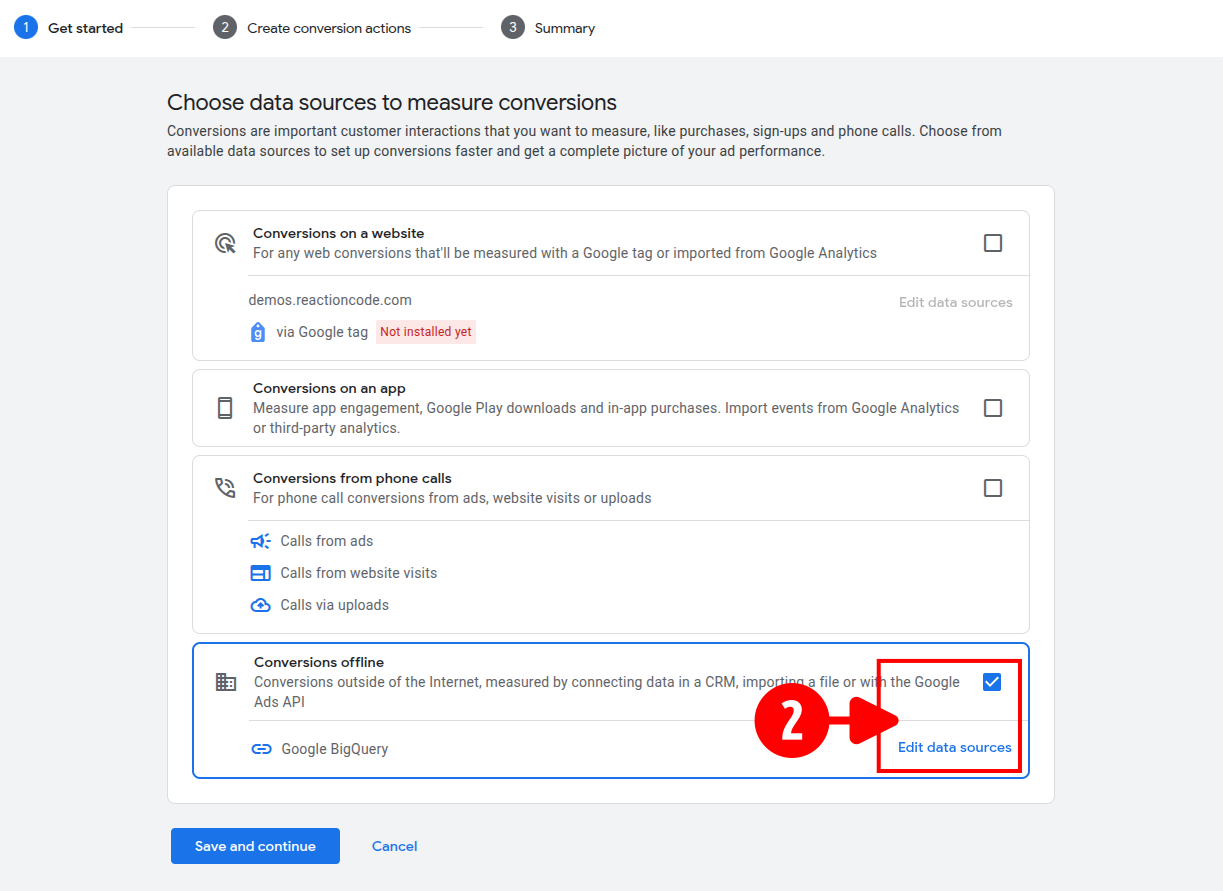
-
Choose Skip this step and set up a data source later, check the customer data consent agreement box.
-
Click Done.
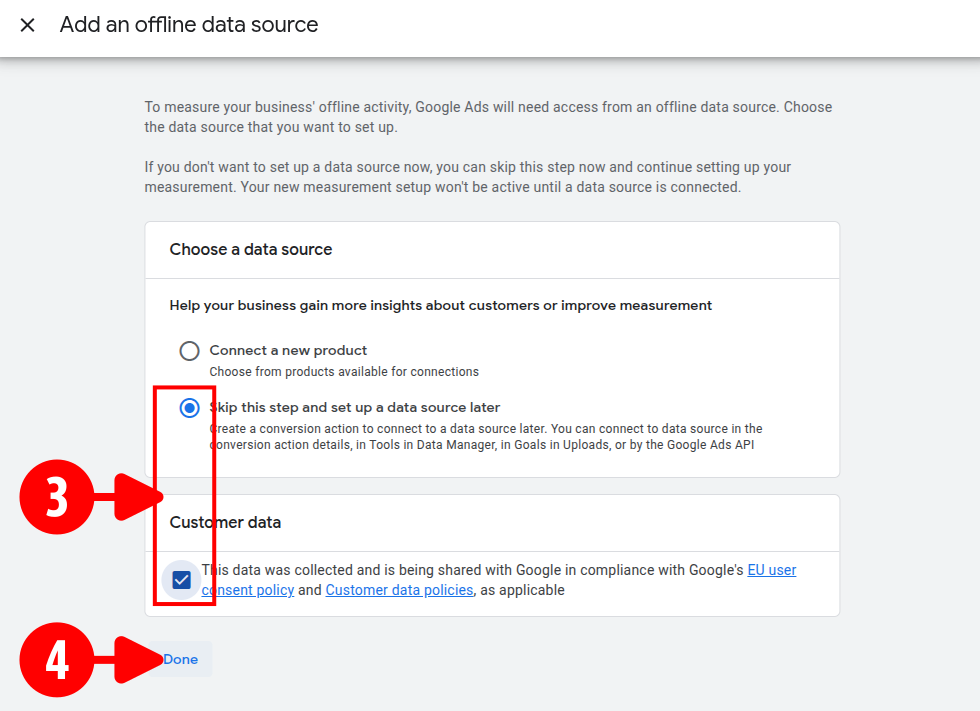
-
Click Save and continue.
- Click + Create conversion.
-
Select Connect data source later to add a new manual conversion action.
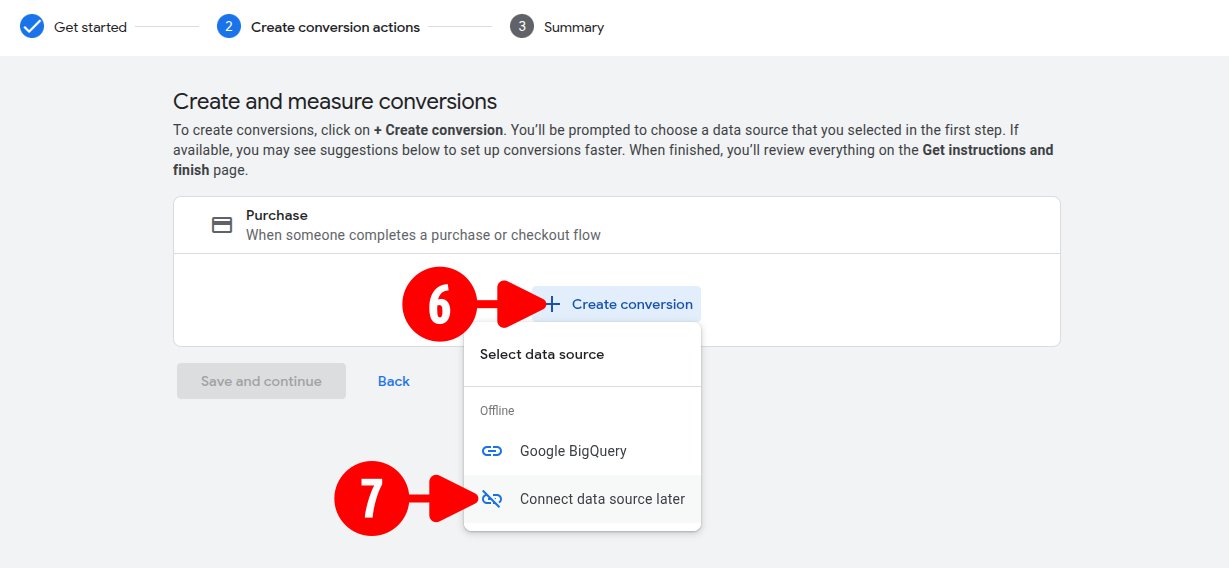
-
Click Edit Settings to expand the configuration panel.
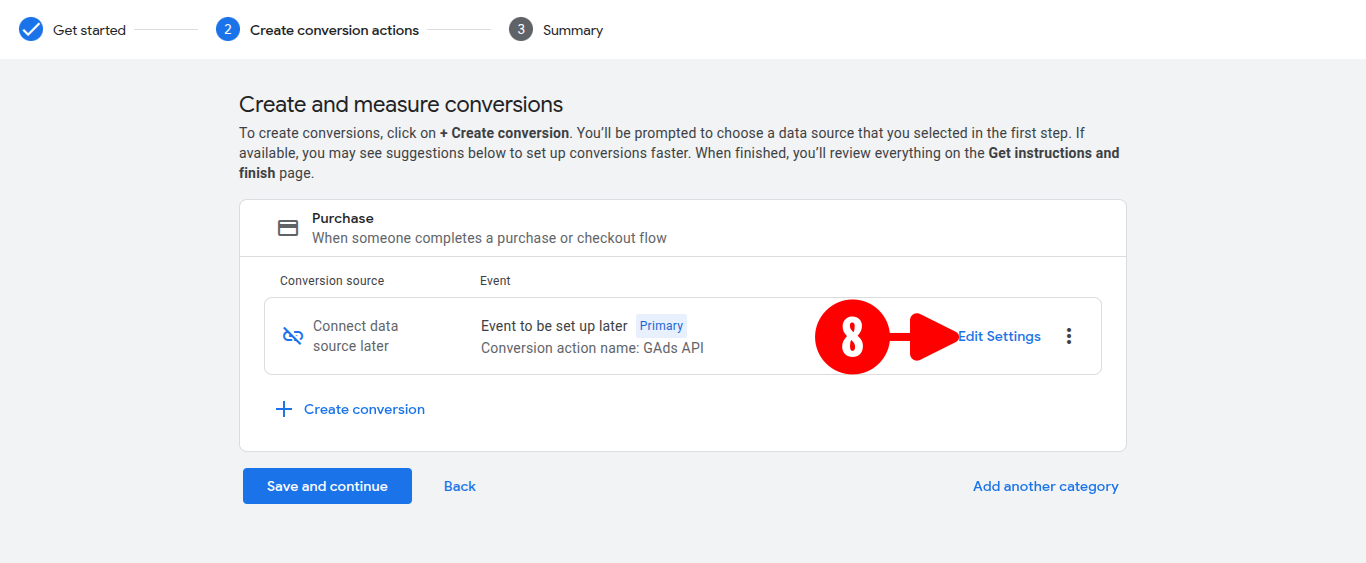
-
Configure the settings exactly as follows in the table.
-
Click Done.
Recommended conversion configuration
Section Values Conversion name GAds API Goal and action optimisation Purchase, Primary action Value Use different values. If there's no value, use (your currency and custom value) Source Import from clicks Count Every conversion Click-through conversion window 30 days Engaged-view conversion window 3 days View-through conversion window 1 day Attribution model Data-driven Enhanced Conversions Enabled 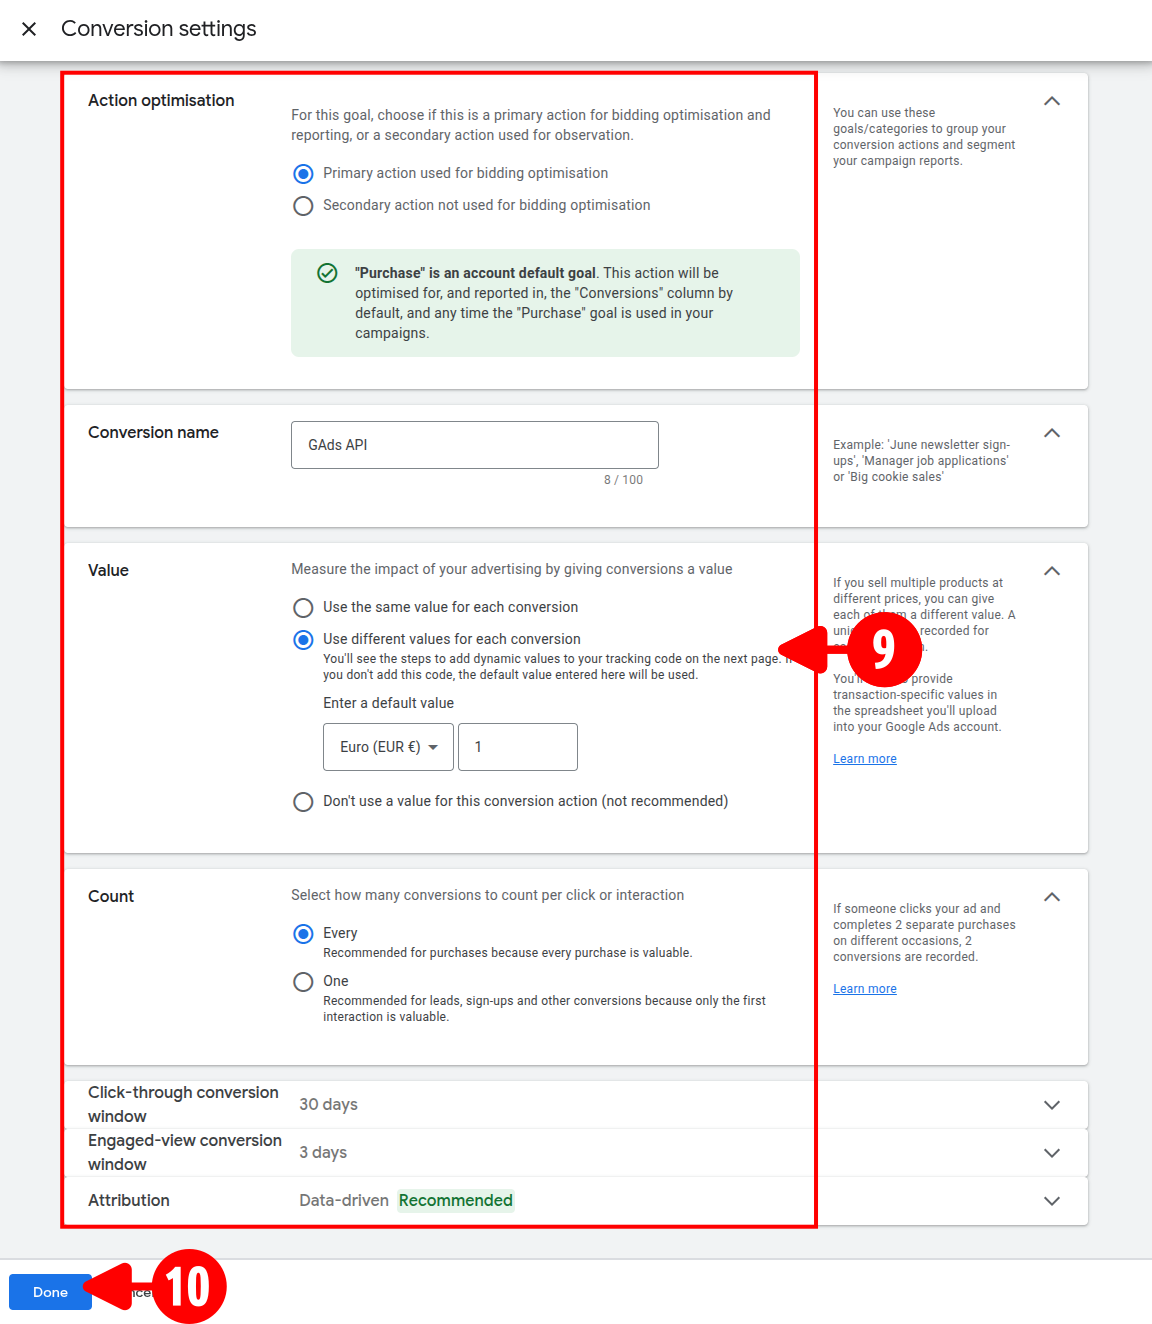
-
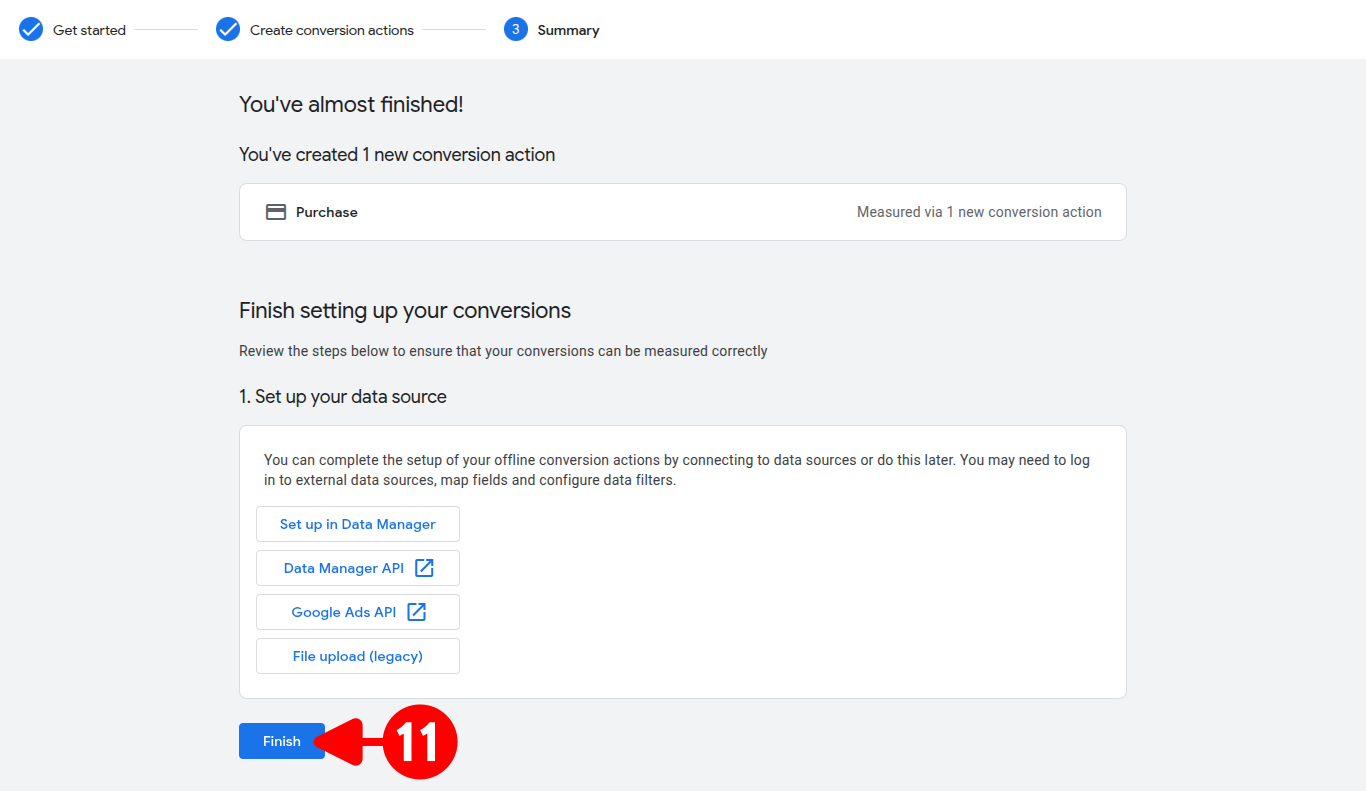
Review the summary screen and click Finish.
Retrieve Conversion ID
Extract the unique identifier for your newly created conversion action using your browser's developer tools.
-
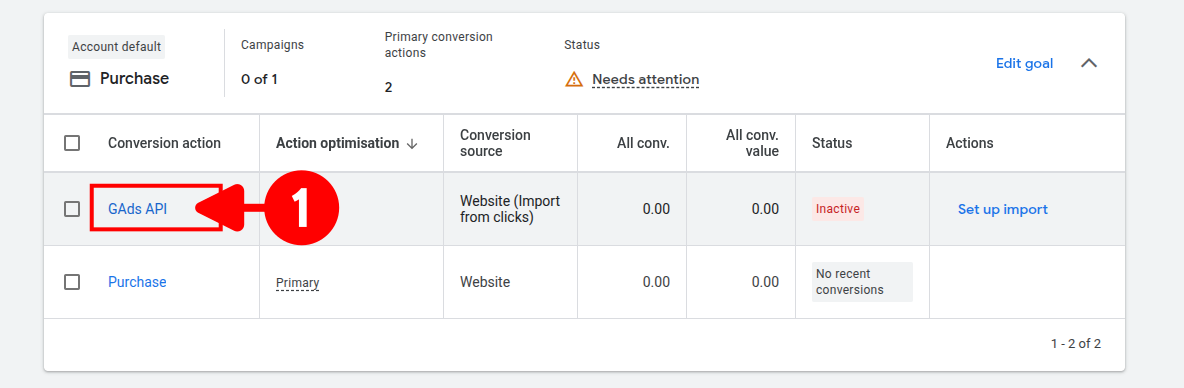
Locate your newly created conversion in the conversions list and click on its name to open the details page.
-
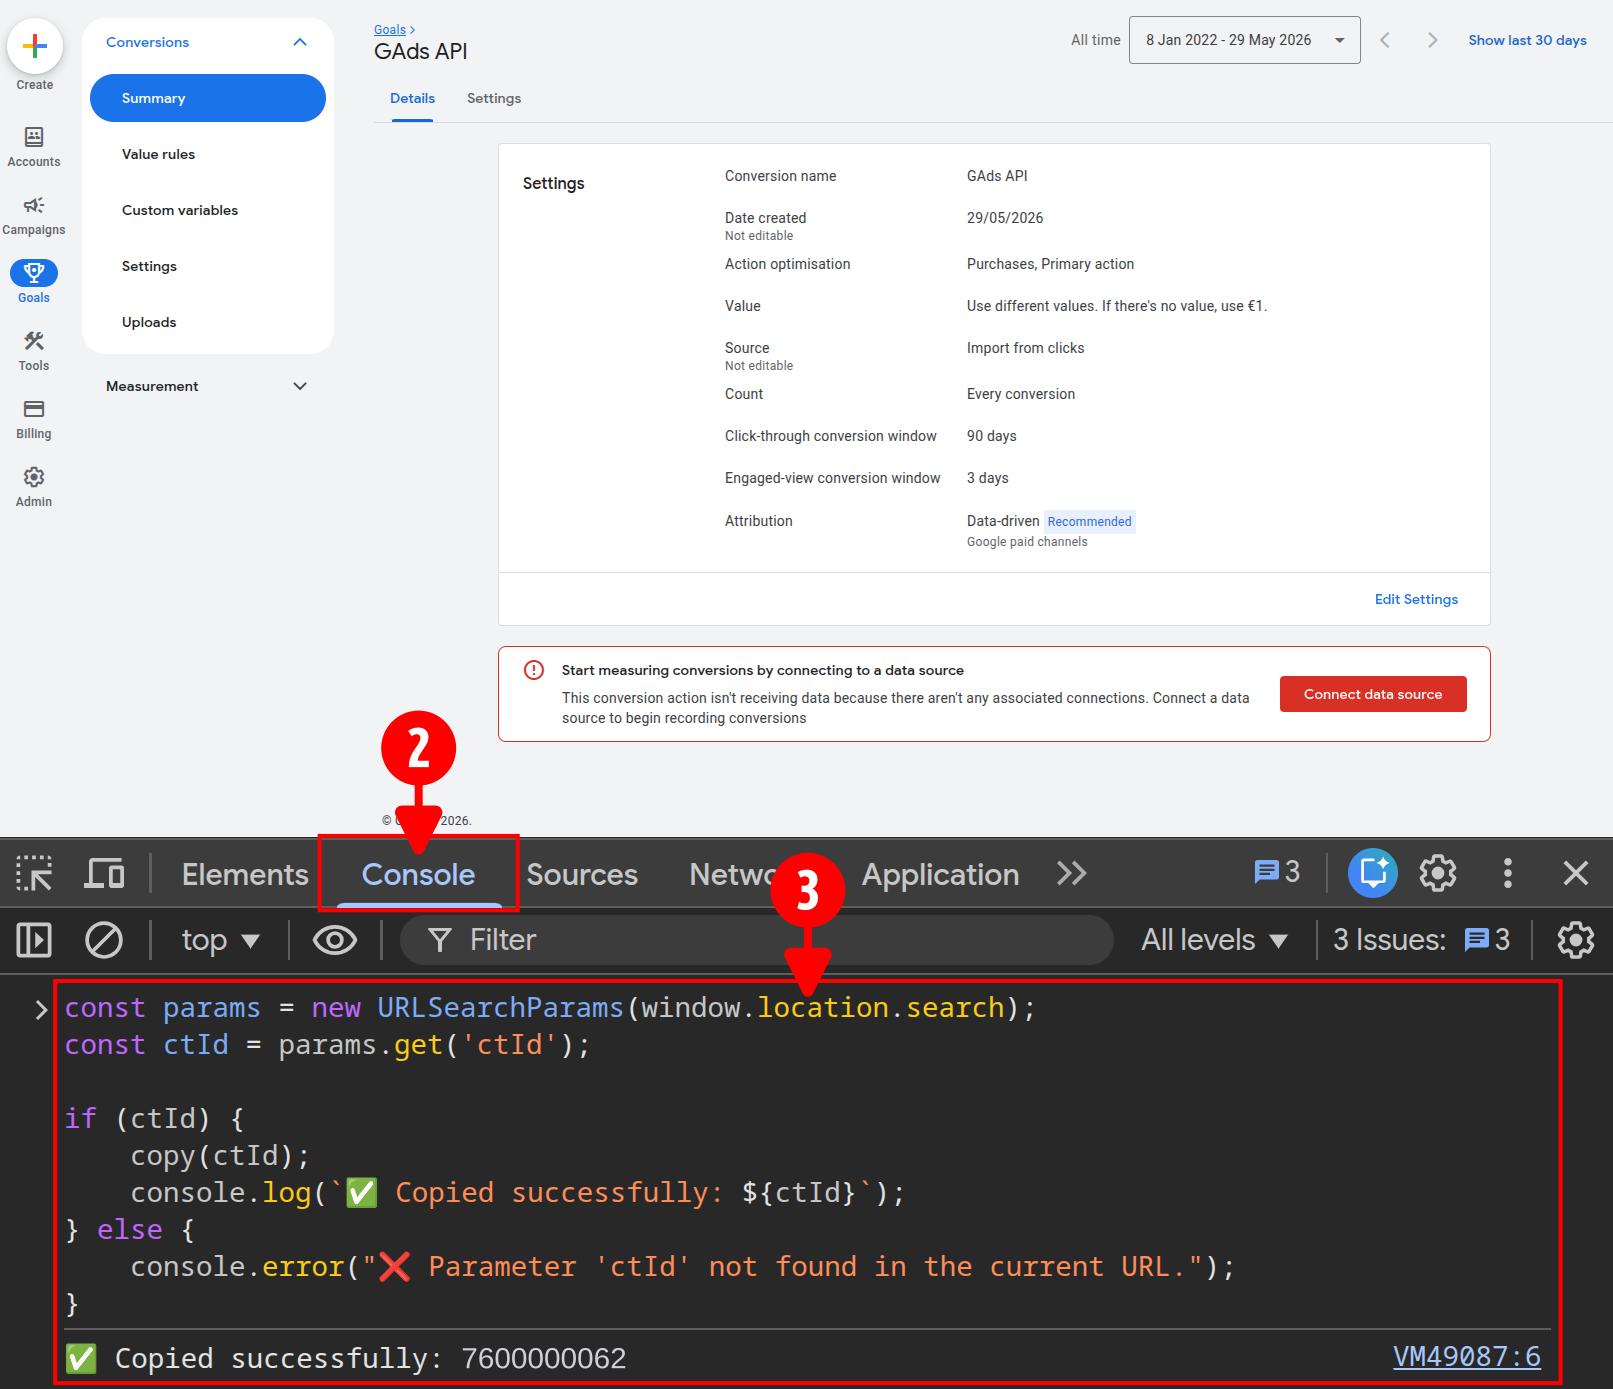
Open your browser's Developer Tools (press
F12orCtrl+Shift+J/Cmd+Option+J) and navigate to the Console tab. -
Paste the following JavaScript code into the console and press Enter:
const params = new URLSearchParams(window.location.search); const ctId = params.get('ctId'); if (ctId) { copy(ctId); console.log(`✅ Copied successfully: ${ctId}`); } else { console.error("❌ Parameter 'ctId' not found in the current URL."); } -
Verify that a green success message appears in the console, confirming the ID has been automatically copied to your clipboard.
Module Configuration
Map the extracted Conversion ID into your PrestaShop module to ensure server-side purchase events are routed to the correct goal.
- Open your PrestaShop module configuration interface and click the Google Ads tab.
- Paste your copied Conversion ID directly into the API Conversion Action ID for Purchase Event input field and click Save.