Configure Conversions
Google Ads Conversion shows you if a customer does some valuable action after click on some of your ads. This allows you to invest more intelligently in the higher-performing elements and ultimately, to increase return on investment.
Conversion Settings
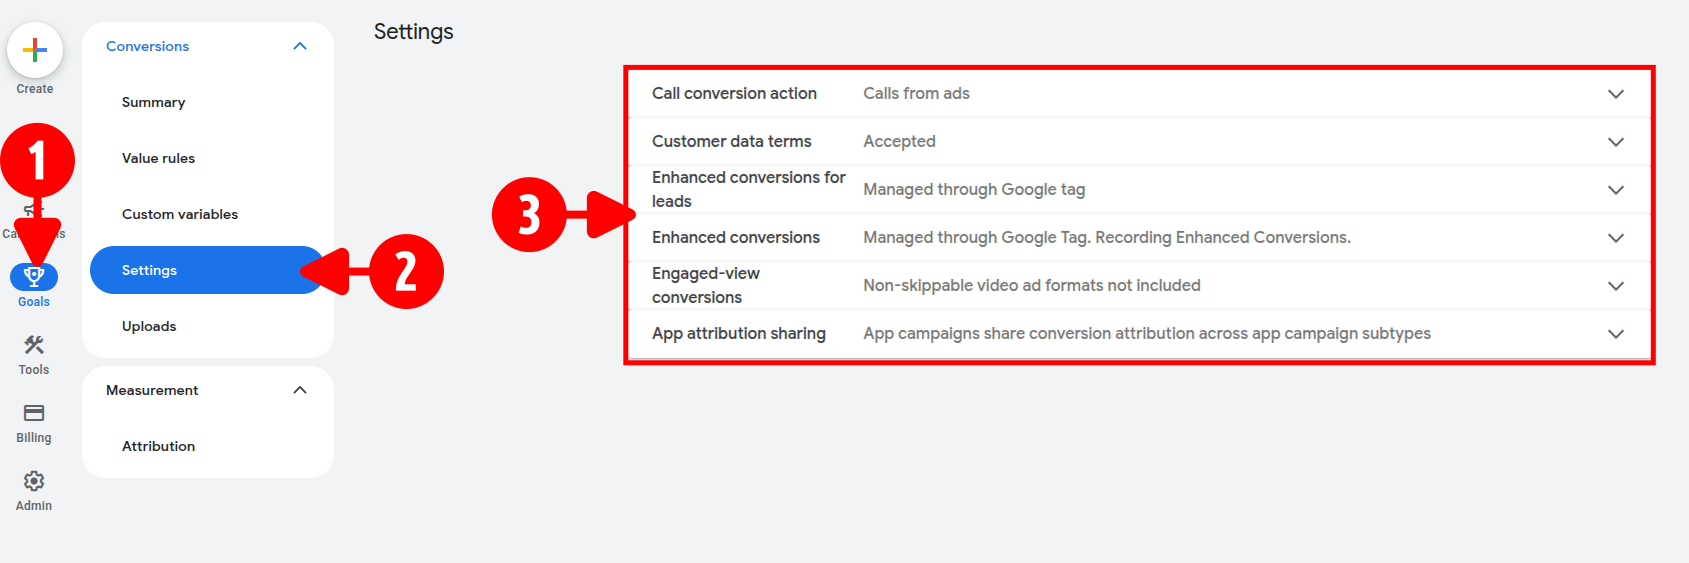
- Click Goals in the left navigation menu.
- Click Settings.
- Configure the global settings according to the recommended values below.
Recommended Conversions Settings
| Section | Values |
|---|---|
| Call conversion action | Calls from ads |
| Customer data terms | Accept them |
| Enhanced conversions for leads | Enable and select Google Tag |
| Enhanced conversions | Enable and select Google Tag |
| Engaged-view conversions | Not relevant |
| App attribution sharing | Not relevant |
Create Conversion Goals
- Click Goals in the left navigation menu.
- Click Conversions, then select Summary.
-
Click New conversion action.

-
Click Edit Data Sources.

-
Enter
yourdomain.cominto the website URL field. -
Click Scan.

-
Select the Google tag.
-
Click Done.

-
Select Conversion on a website.
-
Click Save and continue.

-
Select the appropriate category group for the conversion action based on the recommended mappings below.

Recommended Conversion Groups
Conversion Goal Recommended Category Group Create Account Sign-ups Product View Page view Add To Cart Add to basket Begin Checkout Begin checkout Purchase Purchase -
Click Create conversion.
-
Select the Data Source related to your Google Tag.

-
Click Add a conversion action manually.
- Configure the action parameters according to the recommended configuration tabs below.
-
Click Done to save the configuration.

Recommended conversion configuration
Section Values Conversion name Create account Goal and action optimisation Sign-ups, Secondary action Value Use the same value for each conversion (your currency and custom value) Source Website Count One conversion Click-through conversion window 30 days Engaged-view conversion window 3 days View-through conversion window 1 day Attribution model Data-driven Enhanced Conversions Enabled Section Values Conversion name Product view Goal and action optimisation Page view, Secondary action Value Use the same value for each conversion (your currency and custom value) Source Website Count One conversion Click-through conversion window 30 days Engaged-view conversion window 3 days View-through conversion window 1 day Attribution model Data-driven Enhanced Conversions Enabled Section Values Conversion name Add to cart Goal and action optimisation Add to basket, Secondary action Value Use different values. If there's no value, use (your currency and custom value) Source Website Count Every conversion Click-through conversion window 30 days Engaged-view conversion window 3 days View-through conversion window 1 day Attribution model Data-driven Enhanced Conversions Enabled Section Values Conversion name Begin checkout Goal and action optimisation Begin checkout, Secondary action Value Use different values. If there's no value, use (your currency and custom value) Source Website Count Every conversion Click-through conversion window 30 days Engaged-view conversion window 3 days View-through conversion window 1 day Attribution model Data-driven Enhanced Conversions Enabled Section Values Conversion name Purchase Goal and action optimisation Purchase, Primary action Value Use different values. If there's no value, use (your currency and custom value) Source Website Count Every conversion Click-through conversion window 30 days Engaged-view conversion window 3 days View-through conversion window 1 day Attribution model Data-driven Enhanced Conversions Enabled Enhanced Conversions Warning Messages
Google Ads may display a "Low Match Rate" warning for unlogged guest traffic. This is expected behavior for mixed-traffic scenarios and not a configuration error; standard tracking remains fully operational.
-
Click Add another category to configure remaining conversions.
-
Click Save and continue once all actions are completely configured.

-
Click Use Google Tag Manager.
- Copy the specific Conversion label generated for each conversion goal to pair them within the module settings.
-
Click Finish.

Module Configuration
Map the conversion labels copied from Google Ads to the corresponding conversion labels in the module.
- Navigate to your PrestaShop back office and open the module configuration page.
- Select the Google Ads tab.
- Paste the GAds conversion label into the corresponding input field for each conversion label.
- Click Save to apply the configuration.